Part 2 – Creating the Database Tables using Migrations
Now that we have Laravel installed, we are ready to setup our databases and create our database tables. We will modify the env file to connect to our database. In my case, I am using a MySQL database but laravel has support for other database drivers such as Posgresql and SQLite. All you have to do is modify your env file to point to the proper setup.
For this tutorial, we are going to use database migrations which are a great migration toolset built into laravel. Migrations are a type of version control for your database. They allow a team to modify the database schema and stay up to date on the current schema state. Its good practice to have all changes done to the database handled by these migrations. These migrations can be used to drop/add/rename a column and any other database manipulation we might have to do.
The basic idea behind a migration is to execute conststructive actions (up() actions) and destructive actions (down() actions). Whatever the up() method does, the down() method is going to do the opposite. In this case, we want to create a hamburgers and descriptions database so the opposite would be to drop these tables. Note that you should create a migration per table so we will have a migration file for the hamburgers table and another for the descriptions table.
By default, when you install laravel, it comes with 2 default migrations: one for users (“timestamp”_create_users_table.php) and one for password reset (“timestamp”_create_password_resets_table.php). We will go ahead and build our addtional hamburgers and our descriptions migrations using artisan. Artisan is the command-line interface included with Laravel. It provides a number of helpful commands that can assist you while you build your application.
You can startup artisan by simply typing the following command:
php artisan
To view a list of all available Artisan commands, you may use the list command:
php artisan list
To create our migration, we will use artisan to load the migrations namespace along with its code generators. To make a migration, use the following command:
php artisan make:migration create_hamburgers_table --create=hamburgers
This will generate a file called <timestamp>_create_hamburgers_table. (There is always a timestamp generated in the name of the file. This allows laravel to keep track of the migration files. Think of it as a versioning system) Because we passed the –create parameter with the table name hamburgers, the migration file contains the basic mechanics for building the table.
The same thing will be done for the descriptions table using the command:
php artisan make:migration create_descriptions_table --create=descriptions
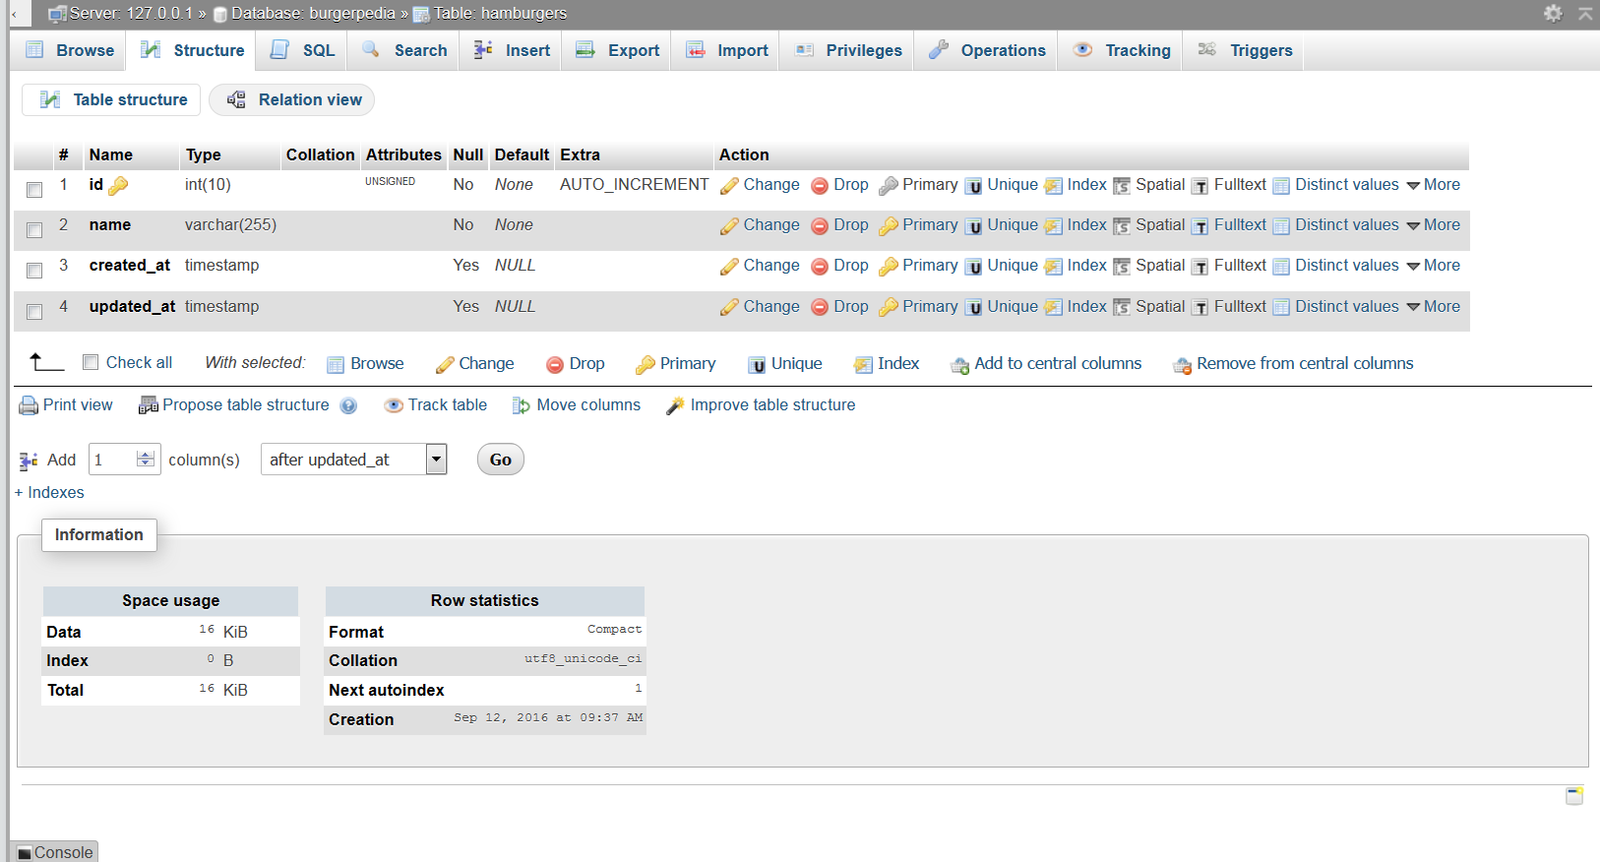
Now lets look inside the create_hamburgers_table.php file. Because we added the –-create parameter, laravel goes ahead and fills the up() and down() methods. If this parameter was not provided both methods would be empty. But because they were provided, laravel goes ahead and makes some assumptions for us. It assumes that:
- We should have an auto-incrementing id
- We should have the created and edited timestamp fields defined
Here is a picture of the generated create_hamburgers_table.php file:

We will go ahead and add a couple of attributes to the table to store the name, overview and author of the hamburger. To do so, we will add a few extra lines in the up() method for the create schema:
php artisan make:migration create_descriptions_table --create=descriptions
In the case of descriptions, a description will always have a relationship to the hamburger along with an actual description of the hamburger. So up() method will now look like so:
    public function up()
    {
        Schema::create('hamburgers', function (Blueprint $table) {
            $table->increments('id');
			$table->string('name');
			$table->string('author');
			$table->text('overview');
            $table->timestamps();
        });
    }
Next, we need to define the descriptions table. A description should always have the autor, the title and actual description itself. We also need to define the fact that a description belongs to a hamburger and define the foreign key that will be used. This is done like so:
$table->integer('hamburger_id')->unsigned();
The first line sets up the column (an unsigned int called ‘hamburger_id’. Then we need to setup the relationship by the following command:
$table->foreign('hamburger_id')->references('id')->on('hamburgers');
The foreign() command tells laravel which column has the relationship and the reference tells which table. So in our case, we have a foreign key called hamburger_id which references the id column on the hamburgers table.
Its best practice to first define the columns and then after that define the relationship inside the migration file.
So here is the full content of the hamburgers migration file:
use Illuminate\Support\Facades\Schema;
use Illuminate\Database\Schema\Blueprint;
use Illuminate\Database\Migrations\Migration;

class CreateHamburgersTable extends Migration
{
    /**
     * Run the migrations.
     *
     * @return void
     */
    public function up()
    {
        Schema::create('hamburgers', function (Blueprint $table) {
            $table->increments('id');
			$table->string('name');
			$table->string('author');
			$table->text('overview');
            $table->timestamps();
        });
    }

    /**
     * Reverse the migrations.
     *
     * @return void
     */
    public function down()
    {
        Schema::dropIfExists('hamburgers');
    }
}
And here is the full content of the descriptions migration file:
use Illuminate\Support\Facades\Schema;
use Illuminate\Database\Schema\Blueprint;
use Illuminate\Database\Migrations\Migration;

class CreateDescriptionsTable extends Migration
{
    /**
     * Run the migrations.
     *
     * @return void
     */
    public function up()
    {
        Schema::create('descriptions', function (Blueprint $table) {
            $table->increments('id');
			$table->integer('hamburger_id')->unsigned();
			$table->foreign('hamburger_id')->references('id')->on('hamburgers');
			$table->string('author');
			$table->string('title');
			$table->text('description');
			$table->softDeletes();
            $table->timestamps();
        });
    }

    /**
     * Reverse the migrations.
     *
     * @return void
     */
    public function down()
    {
        Schema::dropIfExists('descriptions');
    }
}
Now, we can go back to our command line and use artisan to automagically create the tables for us. To get it all done, we run
php artisan migrate
This command will look at our various migration files and create a migrations table to manage all of the migrations that we need to execute. Since we do not have the tables yet, the migration will realize that the tables do not exist and it will go ahead and create them.
If your database is not properly defined in your env file, you will get the following error:
“[PDOException] SQLSTATE[HY00] [2002] No connection could be made because the target machine actively refused it”
OR
“[PDOException] SQLSTATE[HY00] [1049] Unknown database ‘blah’”
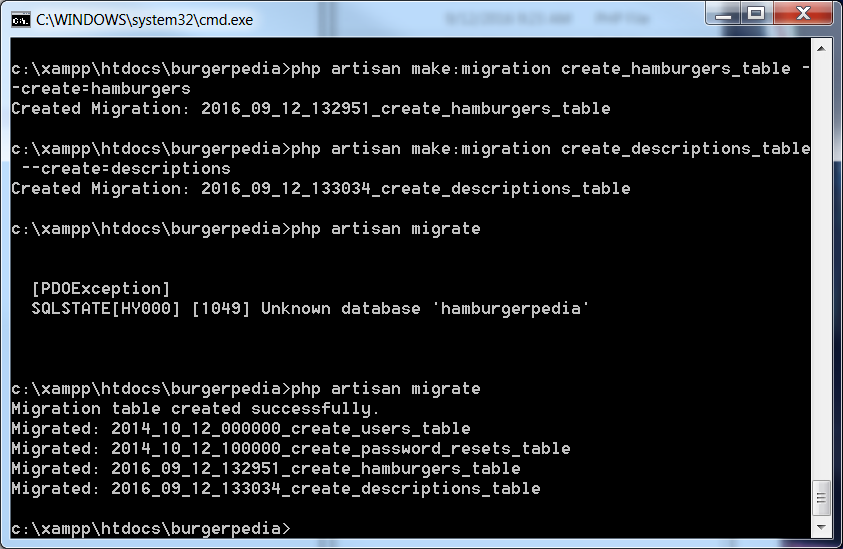
You usually see these type of errors if your env configuration file is not properly setup or if your database credentials are wrong. Otherwise, the migrations should be successful.
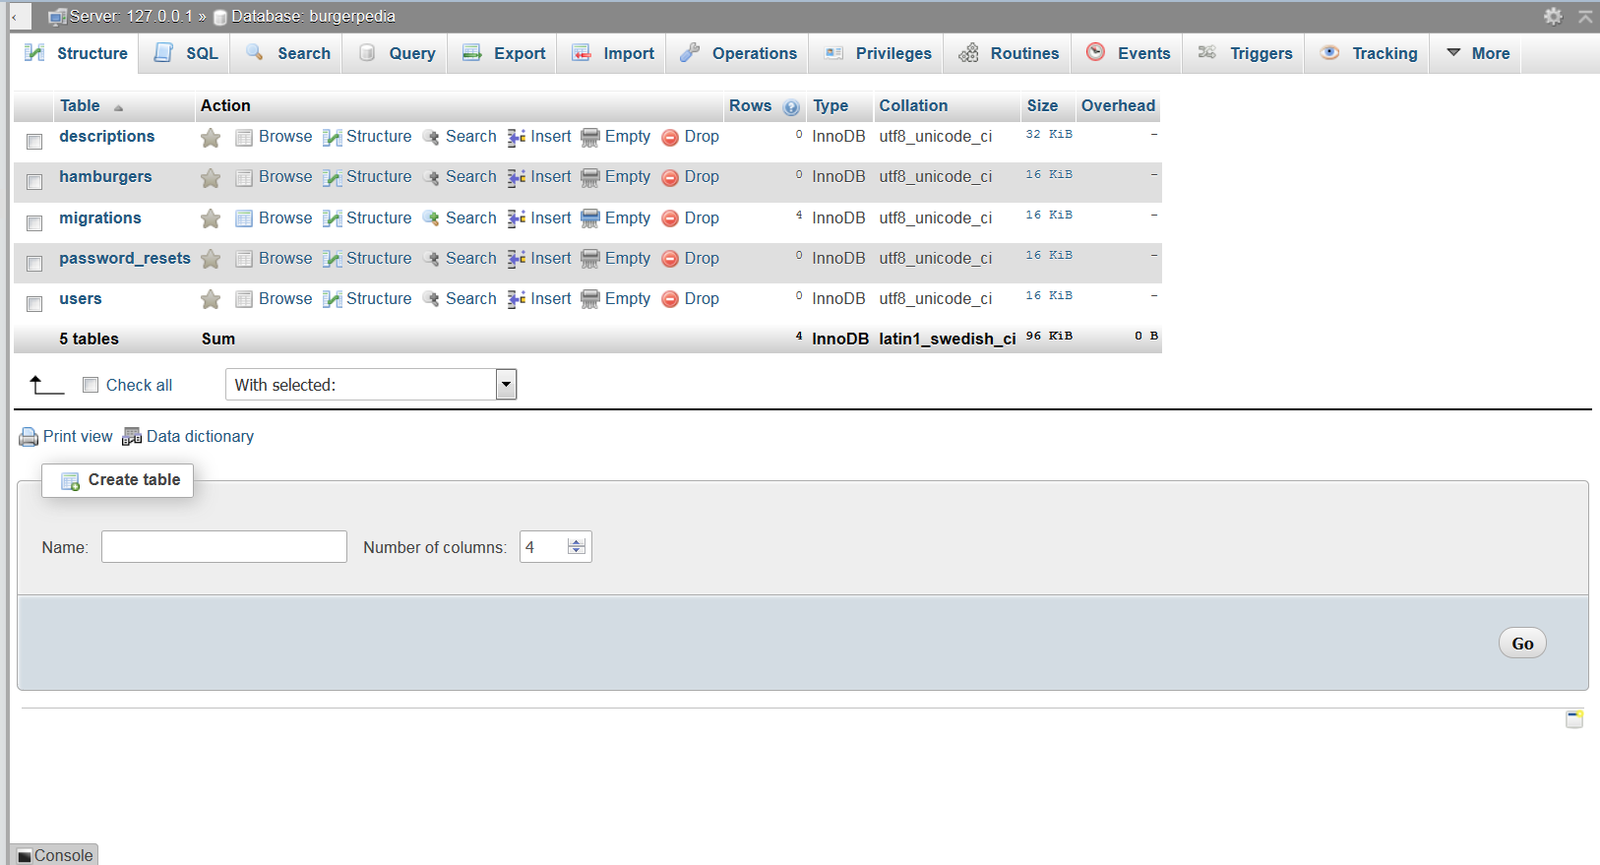
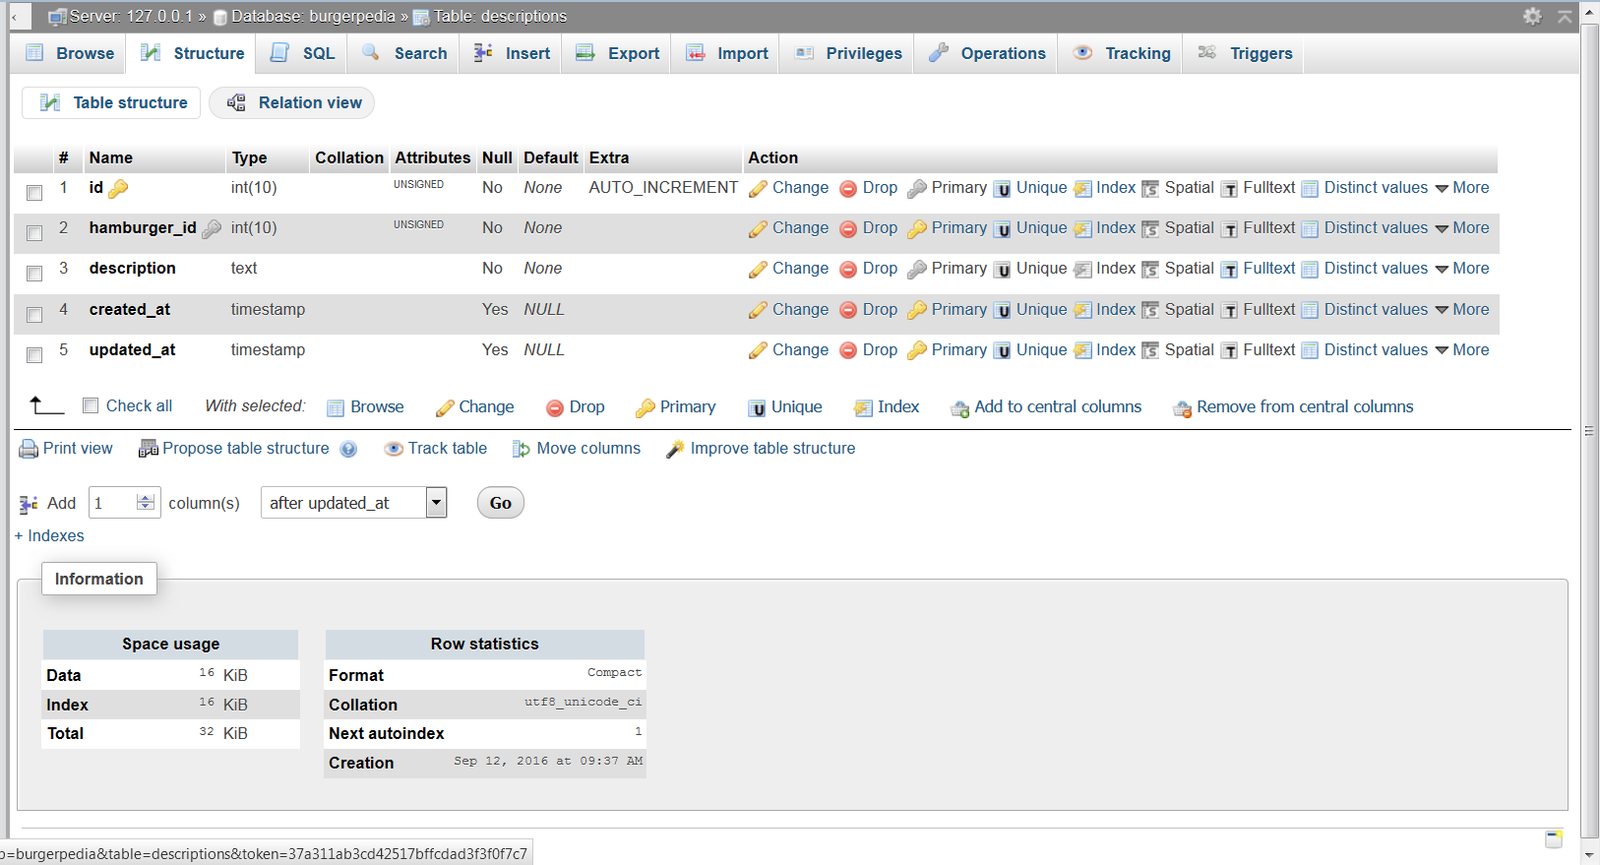
You should now have 2 tables automagically generated for you along with a migrations table. (If you did not delete the standard users and passwords migration files that come prepackaged with Laravel, a users and products table will also have been created). Below is the PHPMyAdmin screenshot of the database and the various tables.
If you ever had to rollback a migration, there is a rollback command that allows you to rollback the mirgration. This could be done using:
php artisan migrate:rollback
This rolls back, one step at a time. So if you had mulitple migration files, it would do one at a time. If you wanted to reset all migrations, then you can use:
php artisan migrate:reset
This will take us all the way back to the begining of the migrations. If you wanted to cleanup the database and then migrate to the latest migration, you can use the command:
php artisan migrate:refresh
It’s a good idea to use the migrations to do all database updates and not do manual SQL updates. Using the migration files guarantees that the code can be deployed on any environment regardless of the status of the environment. If you did manual SQL queries on a given environment, then these changes would be lost to the application, which could make things messy in the future.
Previous Step: Installing Laravel
Next Step: Seeding the Database Tables


When you were writing database tables you used “author” and “overview” but in your database (phpmyadmin) they don`t seem…Is there any problem?