
In the last tutorial, we went over how to setup a Laravel Auth application with admin routing, email activations and more. That tutorial was a lot of fun but it was not complete. I said to myself that, in the future, I would add a second part where I would cover login throttling, Google reCAPTCHA support, front-end validation and social media login. Well I had so much fun with the last tutorial that I’ve already created the second tutorial right away.
UPDATE: I have now decided that I will be creating an Auth trilogy of tutorials for Laravel 5.3. The breakdown will be as follows:
- Part 1: User Authentication with Activation Email and Custom Notifications in Laravel 5.3
- Part 2: Login throttling, Google reCAPTCHA and front-end validations
- Part 3: Social Media login
Important Links:
In this tutorial, we will improve the Auth application that we had previously created. Most of the improvements are security improvements that any application in production should have. The features we will be adding are:
- Adding login throttling with customizable login attempts and lockout time
- Adding support for Google’s reCAPTCHA
- Adding front-end validation using ParsleyJS
- Bonus: Custom error pages
As usual, this tutorial was created with Laravel 5.3 so you should use this version if you plan to follow along. There is also a demo page here and the code is available for download on GitHub.
Adding Support for Login Throttling
Login throttling, also known as rate is limiting protects your login form by blocking users who are trying to brute-force hack your site through the login page. The idea behind login throttling involves counting the number of failed login attempts that a user tries. Once the user or attacker reaches a predefined number of failed login attempts (default number is set to 5), we will block the user from future login attempts for some predefined time (the default is 60 seconds) or we can lock the user out completely. The throttle feature intercepts attempted logins for an IP or IP+username combination. It is up to your application to decide if you want a temporary or permanent lockout.
Most login forms do not stop automated brute-force login attacks. Even WordPress does not stop these attacks by default but there are plugins that you can install that will limit login attempts.
Our initial version of the login function defined in LoginController did not throttle logins. So we will go ahead and add that functionality now.
Laravel 5.3 Login throttling comes right out of the box. By default, Laravel’s LoginController already takes care of this for us. But since we overrode the login functionality, we will need to add the login throtteling logic ourselves. But before we do this, remember that we are using ‘username’ for login instead of the default ‘email’ field used by Laravel. Well, lucky for us, Laravel allows you to define your username field by overriding the username() method. So let’s do that first by defining a username method in our LoginController. This method simply returns the ‘username’ field:
	/**
     * Get the login username to be used by the controller.
     *
     * @return string
     */
    public function username()
    {
        return 'username';
    }
Now we can add proper validation logic. I realize that in the previous tutorial, I actually forgot to add the validation logic. So we will fix that by defining a validateLogin method that looks like so:
	/**
     * Validate the user login request.
     *
     * @param  \Illuminate\Http\Request  $request
     * @return void
     */
    protected function validateLogin(Request $request)
    {
        $this->validate($request, [
            $this->username() => 'required', 'password' => 'required',
        ]);
    }
Finally, we can go ahead and add the login throttling logic to our login() method which now looks like so:
    public function login(Request $request)
    {
		// 1) we validate the request
		$this->validateLogin($request);

		// 2) Check if the user has surpassed their alloed maximum of login attempts
		// We'll key this by the username and the IP address of the client making
		// these requests into this application.
        if ($this->hasTooManyLoginAttempts($request)) {
            $this->fireLockoutEvent($request);

            return $this->sendLockoutResponse($request);
        }

		// 3) now we can attempte the login
        $username      = $request->get('username');
        $password   = $request->get('password');
        $remember   = $request->get('remember');

        if ($this->auth->attempt([
            'username'     => $username,
            'password'  => $password,
			'activated'  => 1,
        ], $remember == 1 ? true : false)) {
			// SUCCESS: If the login attempt was successful we redirect to the dashboard. but first, we
			// clear the login attempts session
			$request->session()->regenerate();
			$this->clearLoginAttempts($request);

            return redirect()->route('admin.dashboard');

        }
        else {

			// FAIL: If the login attempt was unsuccessful we will increment the number of attempts
			// to login and redirect the user back to the login form. Of course, when this
			// user surpasses their maximum number of attempts they will get locked out.
			$this->incrementLoginAttempts($request);

            return redirect()->back()
                ->with('message','Incorrect username or password')
                ->with('status', 'danger')
                ->withInput();
        }

    }
So the logic in this method is pretty easy to follow:
- We validate the credentials of the user
- If validation passes, then we check if the user has reached the maximum number of login attempts. If they have, they will be blocked and get the limit login message
- If not we attempt to login the user
- If they are successful, then we log them in and reset the failed login counter
- If they fail, we redirect them back to the login page and increment the failed login counter
With this update, anyone who has 5 failed logins in a row will be blocked from being able to login to the application for 60 seconds. Now, I had mentioned earlier that it is possible to change these values to whatever you want. To do so, you need to once again override a core method in LoginController. (Remember that we never ever override the core of Laravel. Instead, we override inside the app directory) This time, the method we will override is hasTooManyLoginAttempts(). Not much has changed from the original definition of the method, defined in the core package. I have set a value for lockoutTime and maxLoingAttemtps in the constructor and I basically use these values in this method. I them proceed to call the limiter, just like the core Laravel method currently does. Here is what it all looks like
    /**
     * Create a new controller instance.
     *
     * LoginController constructor.
     * @param Guard $auth
     */
    public function __construct(Guard $auth)
    {
        $this->middleware('guest', ['except' => 'logout']);
		$this->auth = $auth;
        $this->lockoutTime  = 1;    //lockout for 1 minute (value is in minutes)
        $this->maxLoginAttempts = 5;    //lockout after 5 attempts
    }

	/**
     * Determine if the user has too many failed login attempts.
     *
     * @param  \Illuminate\Http\Request  $request
     * @return bool
     */
	protected function hasTooManyLoginAttempts(Request $request)
    {
        return $this->limiter()->tooManyAttempts(
            $this->throttleKey($request), $this->maxLoginAttempts, $this->lockoutTime
        );
    }
By simply setting a lockoutTime and a maxLoginAttempts property on our AuthController, we can override default lockout time and max login attempt limit values. As you may have guessed, lockoutTime defines how long the user will be logged out while maxLoginAttempts defines how many attempts the user is allowed before we lock them out.
We will also modify the logout function so that we now display a success message when the user is logged out. This is done by overriding the logout() method and creating our own. In my case, the logout method does everything that the core logout was doing, which was erasing the session and redirecting the user to the home page. The only thing I do extra is send a status message as well. Here is the full logic for the logout method below:
	/**
     * Log the user out of the application.
     *
     * @param \Illuminate\Http\Request  $request
     * @return \Illuminate\Http\Response
     */
    public function logout(Request $request)
    {
        $this->guard()->logout();

        $request->session()->flush();

        $request->session()->regenerate();

        return redirect('/')
			->with('message','You are now signed out')
			->with('status', 'success')
			->withInput();
    }
The full LoginController file now looks like so:
namespace App\Http\Controllers\Auth;

use App\Http\Controllers\Controller;
use Illuminate\Foundation\Auth\AuthenticatesUsers;
use Illuminate\Contracts\Auth\Guard;
use Illuminate\Http\Request;

class LoginController extends Controller
{
    /*
    |--------------------------------------------------------------------------
    | Login Controller
    |--------------------------------------------------------------------------
    |
    | This controller handles authenticating users for the application and
    | redirecting them to your home screen. The controller uses a trait
    | to conveniently provide its functionality to your applications.
    |
    */

    use AuthenticatesUsers;

    /**
     * Auth guard
     *
     * @var
     */
    protected $auth;

	 /**
     * lockoutTime
     *
     * @var
     */
	protected $lockoutTime;

	/**
     * maxLoginAttempts
     *
     * @var
     */
	protected $maxLoginAttempts;

    /**
     * Where to redirect users after login.
     *
     * @var string
     */
    protected $redirectTo = '/';

    /**
     * Create a new controller instance.
     *
     * LoginController constructor.
     * @param Guard $auth
     */
    public function __construct(Guard $auth)
    {
        $this->middleware('guest', ['except' => 'logout']);
		$this->auth = $auth;
        $this->lockoutTime  = 1;    //lockout for 1 minute (value is in minutes)
        $this->maxLoginAttempts = 5;    //lockout after 5 attempts
    }

	/**
     * Determine if the user has too many failed login attempts.
     *
     * @param  \Illuminate\Http\Request  $request
     * @return bool
     */
	protected function hasTooManyLoginAttempts(Request $request)
    {
        return $this->limiter()->tooManyAttempts(
            $this->throttleKey($request), $this->maxLoginAttempts, $this->lockoutTime
        );
    }

    public function login(Request $request)
    {
		// 1) we validate the request
		$this->validateLogin($request);

		// 2) Check if the user has surpassed their alloed maximum of login attempts
		// We'll key this by the username and the IP address of the client making
		// these requests into this application.
        if ($this->hasTooManyLoginAttempts($request)) {
            $this->fireLockoutEvent($request);

            return $this->sendLockoutResponse($request);
        }

		// 3) now we can attempte the login
        $username      = $request->get('username');
        $password   = $request->get('password');
        $remember   = $request->get('remember');

        if ($this->auth->attempt([
            'username'     => $username,
            'password'  => $password,
			'activated'  => 1,
        ], $remember == 1 ? true : false)) {
			// SUCCESS: If the login attempt was successful we redirect to the dashboard. but first, we
			// clear the login attempts session
			$request->session()->regenerate();
			$this->clearLoginAttempts($request);

            return redirect()->route('admin.dashboard');

        }
        else {

			// FAIL: If the login attempt was unsuccessful we will increment the number of attempts
			// to login and redirect the user back to the login form. Of course, when this
			// user surpasses their maximum number of attempts they will get locked out.
			$this->incrementLoginAttempts($request);

            return redirect()->back()
                ->with('message','Incorrect username or password')
                ->with('status', 'danger')
                ->withInput();
        }

    }

	/**
     * Log the user out of the application.
     *
     * @param \Illuminate\Http\Request  $request
     * @return \Illuminate\Http\Response
     */
    public function logout(Request $request)
    {
        $this->guard()->logout();

        $request->session()->flush();

        $request->session()->regenerate();

        return redirect('/')
			->with('message','You are now signed out')
			->with('status', 'success')
			->withInput();
    }

	/**
     * Get the login username to be used by the controller.
     *
     * @return string
     */
    public function username()
    {
        return 'username';
    }

	/**
     * Validate the user login request.
     *
     * @param  \Illuminate\Http\Request  $request
     * @return void
     */
    protected function validateLogin(Request $request)
    {
        $this->validate($request, [
            $this->username() => 'required', 'password' => 'required',
        ]);
    }
}
And below is a screenshot of too many failed login attempts:

And here is a screenshot of the logout message that was added as well.

Now, there is a future improvement that could be done to make the application even more secure: we can send a notification to the admin whenever a user is blocked out after multiple failed logins. This is not covered in this tutorial but it would be pretty easy to implement using Laravel’s notification system.
Adding Support for reCAPTCHA
Next we will add support for Google’s reCAPTCHA.
To use reCAPTCHA, you need to sign up for an API key pair for your site. The key pair consists of a site key and secret. The site key is used to display the widget on your site. The secret authorizes communication between your application backend and the reCAPTCHA server to verify the user’s response. The secret needs to be kept safe for security purposes.
Here is how it works, according to Google:
When your users submit the form where you integrated reCAPTCHA, you’ll get as part of the payload a string with the name “g-reCAPTCHA-response“. In order to check whether Google has verified that user, send a POST request with these parameters:
URL: https://www.google.com/reCAPTCHA/api/siteverify
|
secret (required) |
Your-Secret-Key-Here |
|
response (required) |
The value of ‘g-reCAPTCHA-response’. |
|
remoteip |
The end user’s ip address. |
The reCAPTCHA documentation site describes more details and advanced configurations.
The first thing that you need to do is signup at http://www.google.com/reCAPTCHA/ to obtain your FREE reCAPTCHA keys for your site. They will provide you with a site key and a secret key for your website.
Now that we have our secret and site keys, we will need to download the PHP reCAPTCHA client library. The PHP library will handle the gruntwork of verifying the reCAPTCHA response from Google using the 3 parameters: secret, g-reCAPTCHA-response and remoteip. We will download the library through composer. Run the following command to get the latest version of the reCAPTCHA library from Google:
composer require google/reCAPTCHA
Once you run this command, you will see that your composer.json file has been modified to include Google’s reCAPTCHA library. Your require section in composer.json will now look like so:
    "require": {
        "php": ">=5.6.4",
        "laravel/framework": "5.3.*",
        "google/recaptcha": "^1.1"
    },
Once you’ve added the requirement for Google ReCAPTCHA. Run the : composer update command to update your dependencies.
composer update
If you are curious, the reCAPTCHA package will be installed in the vendor/google/reCAPTCHA directory. If you want to learn more about Google’s reCAPTCHA package, you can go to https://github.com/google/reCAPTCHA
Now that we have our reCAPTCHA keys and the reCAPTCHA PHP library, we are ready to modify our application. We will update our .env file to include our reCaptha site and secret keys. This will be used later when we implement the reCAPTCHA logic. Here are the settings in our .env file:
	SETTINGS_GOOGLE_RECAPTCHA_SECRET_KEY=Enter-Your-Secret-Key-Here
	SETTINGS_GOOGLE_RECAPTCHA_SITE_KEY=Enter-Your-Site-Key-Here
Don’t forget to change these values to your actual reCAPTCHA keys.
Now, we can create a new trait to handle the reCAPTCHA verification since it will be used in multiple files. It will be created in Traits\reCAPTCHATrait.php and here is its contents:
namespace App\Traits;

use ReCaptcha\ReCaptcha;

trait reCaptchaTrait {

    public function verifyCaptcha($response)
    {

        $remoteip = $_SERVER['REMOTE_ADDR'];
        $secret   = env('SETTINGS_GOOGLE_RECAPTCHA_SECRET_KEY');

        $recaptcha = new ReCaptcha($secret);
        $status = $recaptcha->verify($response, $remoteip);
        if ($status->isSuccess()) {
            return true;
        } else {
            return false;
        }

    }

}
As you can see, this trait uses the newly downloaded reCAPTCHA library to create a reCAPTCHA object. This object is responsible for verifying the Google’s response and returning success or fail.
Now we have the logic for the reCAPTCHA trait setup. So we just need to update our controller to use our newly created trait. Let’s open the register controller and add support for reCAPTCHA. We need to update the validator method to use the reCaptcha Trait to communicate with Google to verify the captcha input. It now looks like so:
    /**
     * Get a validator for an incoming registration request.
     *
     * @param  array  $data
     * @return \Illuminate\Contracts\Validation\Validator
     */
    protected function validator(array $data)
    {

		// call the verifyCaptcha method to see if Google approves
		$data['captcha-verified'] = $this->verifyCaptcha($data['g-recaptcha-response']);

        $validator = Validator::make($data,
            [
                'username'           	 => 'required|unique:users|min:4',
				'first_name'            => 'required',
                'last_name'             => 'required',
                'email'                 => 'required|email|unique:users',
                'password'              => 'required|min:6|max:20',
                'password_confirmation' => 'required|same:password',
				'g-recaptcha-response'  => 'required',
				'captcha-verified'      => 'required|min:1'
            ],
            [
				'username.required'     => 'Username is required',
                'username.min'           => 'Username needs to have at least 6 characters',
                'first_name.required'   => 'First Name is required',
                'last_name.required'    => 'Last Name is required',
                'email.required'        => 'Email is required',
                'email.email'           => 'Email is invalid',
                'password.required'     => 'Password is required',
                'password.min'          => 'Password needs to have at least 6 characters',
                'password.max'          => 'Password maximum length is 20 characters',
				'g-recaptcha-response.required' => 'Please confirm that you are not a robot',
				'captcha-verified.min'           => 'reCaptcha verification failed'
            ]
        );

        return $validator;
    }
There is also additional definitions for the reCAPTCHA validation error messages.
Now, all that remains is the view file. First we need to add the Javascript for reCAPTCHA to our layout file. Open up the auth.blade.php layout file and add the following line inside the <head></head> block:
<script src='https://www.google.com/reCAPTCHA/api.js'></script></p>
According to Google,
“The easiest method for rendering the reCAPTCHA widget on your page is to include the necessary JavaScript resource and a g-reCAPTCHA tag. The g-reCAPTCHA tag is a DIV element with class name ‘g-reCAPTCHA‘ and your site key in the data-sitekey attribute”
.So, lets follow what Google recommends. Open up the register.blade.php file to add the reCAPTCHA input inside the form. The input looks like so:
<div class="g-reCAPTCHA" data-sitekey="{{ env('SETTINGS_GOOGLE_RECAPTCHA_SITE_KEY') }}"></div>
To make things a bit more pretty, I added a CSS styling to make it a bit prettier. (It is included in the auth.css file that you can view on GitHub.) Here is the output of the register page now:

Here is a screenshot of what happens when the user fails the reCAPTCHA:

Finally, I will go ahead clean things up a bit. Since not all my the auth pages will have the reCAPTCHA element, I will add a new section in the view called scripts and update the auth layout to display the scripts section at the bottom of the file. This scripts section will contain the reCAPTCHA JavaScript library, so I can now choose which views can load reCAPTCHA or not. Remember: not every view needs to have the scripts section. So, for the sake of this tutorial, only the register.blade.php will have the reCAPTCHA functionality and load the scripts section. Here is what auth.blade.php looks with the addition of the scripts section.
<!DOCTYPE html>
<html lang="en">
<head>
    <meta charset="utf-8">
    <meta name="robots" content="noindex">

    <title>@yield('title')</title>
        <meta name="viewport" content="width=device-width, initial-scale=1">
    <link href="http://maxcdn.bootstrapcdn.com/bootstrap/3.3.0/css/bootstrap.min.css" rel="stylesheet" id="bootstrap-css">
	<link rel="stylesheet" id="auth-css" href="{!! asset('assets/css/auth.css') !!}" type="text/css" media="all">
    <script src="http://code.jquery.com/jquery-1.10.2.min.js"></script>
    <script src="http://maxcdn.bootstrapcdn.com/bootstrap/3.3.0/js/bootstrap.min.js"></script>


</head>
<body>

	@yield('content')

</body>
	@yield('scripts')
</html>
Here is what register.blade.php looks like with the addition of the scripts section.
@extends('layouts.auth')

@section('title', 'Register')
@section('description', 'Register to the admin area')

@section('content')
	<div class="container">
		<div class="card-container text-center">
			<h1>Create Your Account</h1>
		</div>
	</div>
    <div class="container">

		<div class="row">
		  @include('notifications.status_message')
		  @include('notifications.errors_message')
		  <div class="col-md-6">
			<div class="card-container text-center">
				<img src="assets/img/register-splash.jpg" alt="Tutorial Splash image">
			</div>
		  </div>
		  <div class="col-md-6">
			<div class="card card-container">
				<form class="form-signin" method="POST" action="{{ url('/register') }}" id="form-register">
					{{ csrf_field() }}
					<input type="text" id="username" name="username" class="form-control" placeholder="Username" value="{{ old('username') }}" required autofocus>
					@if ($errors->has('username'))
						<span class="help-block">
							<strong>{{ $errors->first('name') }}</strong>
						</span>
					@endif
					<input type="text" id="first_name" name="first_name" class="form-control" placeholder="First name" value="{{ old('first_name') }}"  required autofocus>
					@if ($errors->has('first_name'))
						<span class="help-block">
							<strong>{{ $errors->first('name') }}</strong>
						</span>
					@endif
					<input type="text" id="last_name" name="last_name" class="form-control" placeholder="Last name" value="{{ old('last_name') }}" required autofocus>
					@if ($errors->has('last_name'))
						<span class="help-block">
							<strong>{{ $errors->first('name') }}</strong>
						</span>
					@endif
					<input type="email" id="email" name="email" class="form-control" placeholder="Email address" value="{{ old('email') }}" required autofocus >
					@if ($errors->has('email'))
						<span class="help-block">
							<strong>{{ $errors->first('email') }}</strong>
						</span>
					@endif
					<input type="password" id="password" name="password" class="form-control" placeholder="Password" required>
					@if ($errors->has('password'))
						<span class="help-block">
							<strong>{{ $errors->first('password') }}</strong>
						</span>
					@endif
					<input type="password" id="password-confirm" name="password_confirmation" class="form-control" placeholder="Confirm Password" required>
					<div class="g-reCAPTCHA" data-sitekey="{{ env('SETTINGS_GOOGLE_RECAPTCHA_SITE_KEY') }}"></div>

					<button class="btn btn-lg btn-primary btn-block btn-signin" type="submit">Sign up</button>
				</form><!-- /form -->
				<a href="{{ url('/password/forget') }}" class="forgot-password">Forgot password?</a> or <a href="{{ url('/username/forget') }}" class="forgot-password">Forgot username?</a>
			</div><!-- /card-container -->
		  </div>
		</div>


		<div class="card-container text-center">
			<a href="{{ url('/') }}" class="new-account">Back to Home page</a> or <a href="{{ url('/login') }}" class="new-account">Login</a>
		</div>

    </div><!-- /container -->
@endsection

@section('scripts')
<script src='https://www.google.com/reCAPTCHA/api.js'></script>
@endsection
Adding Front-End validation using Parsley
Although we already do backend validation through Laravel’s validator, it’s also good practice to do some frontend or client-side validation before any of our forms are submitted. These days, client-side validation is always done through JavaScript and there are many JavaScript form validation libraries out there. JavaScript form validation is not necessary, and if used, it does not replace strong backend server validation. Keep in mind that client side validation is never enough in any project because the JavaScript can be bypassed and people can submit requests directly to the server. However, that doesn’t mean client side validation should be forgotten.
For our client-side validation, we will be using the increasingly popular Parsley JavaScript library. Parsley is a JavaScript form validation library that helps you provide your users with feedback on their form submission before sending it to your server. It saves you bandwidth, server load and it saves time for your users. Why did I go with Parsley? Because it’s simple and intuitive. Parsley lets you simply write in English your requirements inside your form HTML tags, Parsley will do the rest! No need to write even a single JavaScript line for simple form validation. It also does dynamic validation and comes with over a dozen basic validators pre-defined. You can learn more by going to Parsley’s official website. I also like this library because it was created by fellow Canadians.
Download the latest version of parsley and place it in assets/js/plugins/parsley/parsley.js. Then we will go ahead and include the Parsley JavaScript library in our signup blade template inside the script section that we previously created. Here is what we will add:
@section('scripts')
<script src='https://www.google.com/recaptcha/api.js'></script>
<script src="{!! asset('assets/js/plugins/parsley/parsley.js.') !!}"></script>
<script>
$(function () {
  $('#form-register').parsley().on('field:validated', function() {
    var ok = $('.parsley-error').length === 0;
    $('.client-feedback-success').toggleClass('hidden', !ok);
    $('.client-feedback-warning').toggleClass('hidden', ok);
  });
});
</script>
@endsection
All that this code is doing is including parsley in the script section and setting up a validation function for Parsley. The validation function basically toggles on/off the client feedback classes. That is the only piece of code that we need to write. Parsley takes care of everything else.
You must add the data-parsley-validate attribute to each <form> you want to be validated. Then for any given input field in the form, you can use the data-parsley- attribute. Parsley uses a specific DOM API which allows you to configure pretty much everything directly from your DOM, without writing a single javascript configuration line or custom function. Parsley’s default DOM API is data-parsley-. That means that if in config you see a foo property, it can be set/modified via DOM with data-parsley-foo="value".
Now let’s take a look at one of our input fields. I chose the username field. Here is what the input field code for username now looks like:
<input type="text" id="username" name="username" class="form-control" placeholder="Username" value="{{ old('username') }}" required autofocus data-parsley-required-message="A username is required" data-parsley-trigger="change focusout" data-parsley-minlength="3" data-parsley-maxlength="20">
You will notice the various Parsley attributes that have been added. This includes:
data-parsley-required-message="A username is required"data-parsley-trigger="change focusout"data-parsley-minlength="3"data-parsley-maxlength="20"
So, just looking at the data attributes, you can quickly tell that we have setup a message to inform the user that a username is required. The trigger for this message is when we gain or lose focus on this input field. We have also established that the minimum length is 3 and the maximum length is 20. That’s why Parsley makes front-end validation so simple! Below is the register view with every input element and its Parsley validators
@extends('layouts.auth')

@section('title', 'Register')
@section('description', 'Register to the admin area')

@section('content')
	<div class="container">
		<div class="card-container text-center">
			<h1>Please Create Your Account</h1>
			<h2>Use the form below to register</h2>
		</div>
	</div>
    <div class="container">

		<div class="row">
		  @include('notifications.status_message')
		  @include('notifications.errors_message')
		  <div class="col-md-6">
			<div class="card-container text-center">
				<img src="assets/img/register-splash.jpg" alt="Tutorial Splash image">
			</div>
		  </div>
		  <div class="col-md-6">
			<div class="card card-container">
				<div class="client-feedback client-feedback-warning hidden">
				  <h4>Houston, We Have A Problem!</h4>
				  <p>Please fix the issues below.</p>
				</div>

				<div class="client-feedback client-feedback-success hidden">
				  <h4>Your A Champ!</h4>
				  <p>All your information checks out.</p>
				</div>
				<form class="form-signin" method="POST" action="{{ url('/register') }}" id="form-register" data-parsley-validate="">
					{{ csrf_field() }}
					<input type="text" id="username" name="username" class="form-control" placeholder="Username" value="{{ old('username') }}" required autofocus data-parsley-required-message="A username is required" data-parsley-trigger="change focusout" data-parsley-minlength="3" data-parsley-maxlength="20">
					@if ($errors->has('username'))
						<span class="help-block">
							<strong>{{ $errors->first('name') }}</strong>
						</span>
					@endif
					<input type="text" id="first_name" name="first_name" class="form-control" placeholder="First name" value="{{ old('first_name') }}"  required autofocus data-parsley-required-message="A first name is required" data-parsley-trigger="change focusout" data-parsley-pattern="/^[a-zA-Z]*$/" data-parsley-minlength="2" data-parsley-maxlength="32">
					@if ($errors->has('first_name'))
						<span class="help-block">
							<strong>{{ $errors->first('name') }}</strong>
						</span>
					@endif
					<input type="text" id="last_name" name="last_name" class="form-control" placeholder="Last name" value="{{ old('last_name') }}" required autofocus data-parsley-required-message="A last name is required" data-parsley-trigger="change focusout" data-parsley-pattern="/^[a-zA-Z]*$/" data-parsley-minlength="2" data-parsley-maxlength="32">
					@if ($errors->has('last_name'))
						<span class="help-block">
							<strong>{{ $errors->first('name') }}</strong>
						</span>
					@endif
					<input type="email" id="email" name="email" class="form-control" placeholder="Email address" value="{{ old('email') }}" required autofocus data-parsley-required-message="An email address is required" data-parsley-trigger="change focusout" data-parsley-type="email">
					@if ($errors->has('email'))
						<span class="help-block">
							<strong>{{ $errors->first('email') }}</strong>
						</span>
					@endif
					<input type="password" id="password" name="password" class="form-control" placeholder="Password" required  data-parsley-required-message="A password is required" data-parsley-trigger="change focusout" data-parsley-minlength="6" data-parsley-maxlength="20">
					@if ($errors->has('password'))
						<span class="help-block">
							<strong>{{ $errors->first('password') }}</strong>
						</span>
					@endif
					<input type="password" id="password-confirm" name="password_confirmation" class="form-control" placeholder="Confirm Password" required  data-parsley-required-message="You must confirm your password" data-parsley-trigger="change focusout" data-parsley-minlength="6" data-parsley-maxlength="20" data-parsley-equalto="#password" data-parsley-equalto-message="Confirmation Password does not Match">
					<div class="g-recaptcha" data-sitekey="{{ env('SETTINGS_GOOGLE_RECAPTCHA_SITE_KEY') }}"></div>

					<button class="btn btn-lg btn-primary btn-block btn-signin" type="submit">Sign up</button>
				</form><!-- /form -->
				<a href="{{ url('/password/forget') }}" class="forgot-password">Forgot password?</a> or <a href="{{ url('/username/forget') }}" class="forgot-password">Forgot username?</a>
			</div><!-- /card-container -->
		  </div>
		</div>


		<div class="card-container text-center">
			<a href="{{ url('/') }}" class="new-account">Back to Home page</a> or <a href="{{ url('/login') }}" class="new-account">Login</a>
		</div>

    </div><!-- /container -->
@endsection

@section('scripts')
<script src='https://www.google.com/recaptcha/api.js'></script>
<script src="{!! asset('assets/js/plugins/parsley/parsley.js.') !!}"></script>
<script>
$(function () {
  $('#form-register').parsley().on('field:validated', function() {
    var ok = $('.parsley-error').length === 0;
    $('.client-feedback-success').toggleClass('hidden', !ok);
    $('.client-feedback-warning').toggleClass('hidden', ok);
  });
});
</script>
@endsection
There are other attributes that are set for the various input fields but here is a screenshot of various errors that were caught by Parsley on the register page :

And here is a screenshot of the register page when validation passes:

The other form pages all have the parsley validation setup as well so you can play around with them in the demo application. Below is a screenshot of the login page with Parsley validation:

In this tutorial, I am only using Parsley to inform the user of errors but I do not prevent them from submitting the form. One possible improvement could be to block the user from submitting the form until there are no errors from Parsley.
Adding Custom Error Pages
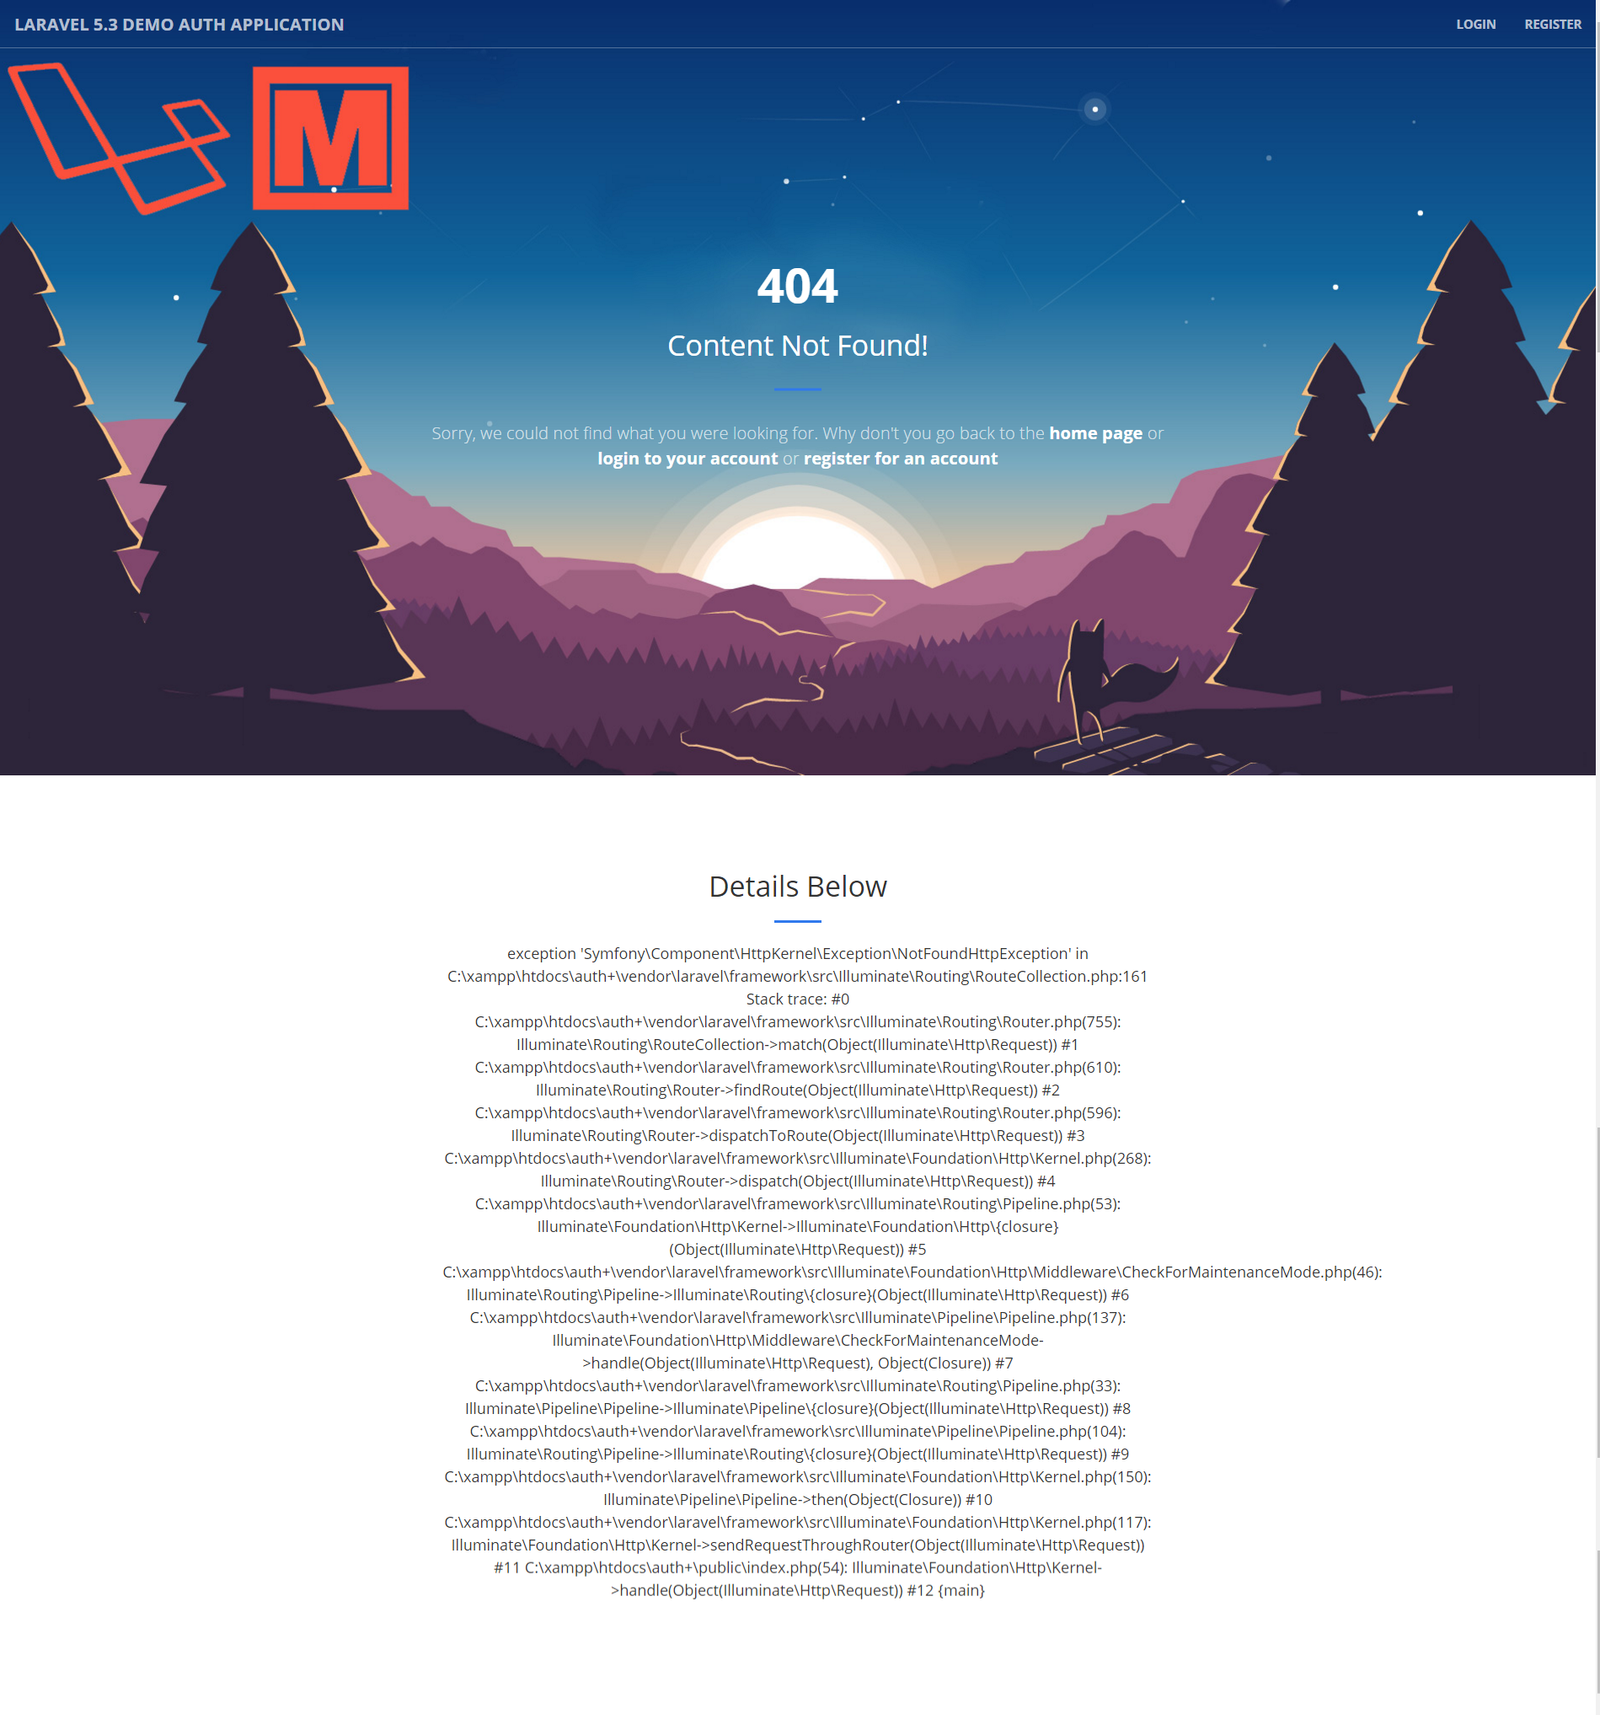
The last thing that we need to do is create some custom error pages instead of the standard Laravel error page. Here is a standard Laravel page:

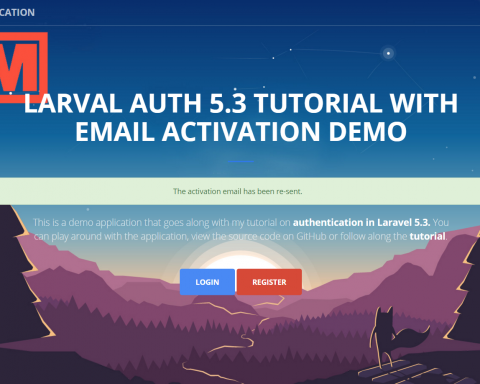
We will update it so that it looks like so:

It’s actually quite simple to do. Laravel allows you to create custom errors. All you need to do is define a template for each of the error codes that you want to handle. Here is Laravel’s official documentation
“Laravel makes it easy to display custom error pages for various HTTP status codes. For example, if you wish to customize the error page for 404 HTTP status codes, create a
resources/views/errors/404.blade.php. This file will be served on all 404 errors generated by your application. The views within this directory should be named to match the HTTP status code they correspond to. TheHttpExceptioninstance raised by theabortfunction will be passed to the view as an$exceptionvariable. ”
The following is the contents of the views/errors/404.blade.php
@extends('layouts.front')

@section('content')
    <header>
        <div class="header-content">
            <div class="header-content-inner">
                <h1 id="homeHeading">404</h1>
				<h2>Content Not Found!</h2>
                <hr>
				@include('notifications.status_message')
				@include('notifications.errors_message')
                <p>Sorry, we could not find what you were looking for. Why don't you go back to the <a href="{{ url('/') }}" >home page</a> or <a href="{{ url('/login') }}" >login to your account</a> or <a href="{{ url('/register') }}">register for an account</a> </p>


            </div>
        </div>
    </header>
@endsection
We will update the template to actually include the log details stored in the $exception variable, but only when the debug flag is on. So the 404 blade template will now look like so:
@extends('layouts.front')

@section('content')
    <header>
        <div class="header-content">
            <div class="header-content-inner">
                <h1 id="homeHeading">404</h1>
				<h2>Content Not Found!</h2>
                <hr>
				@include('notifications.status_message')
				@include('notifications.errors_message')
                <p>Sorry, we could not find what you were looking for. Why don't you go back to the <a href="{{ url('/') }}" >home page</a> or <a href="{{ url('/login') }}" >login to your account</a> or <a href="{{ url('/register') }}">register for an account</a> </p>


            </div>
        </div>
    </header>
	@if(config('app.debug'))
	<section id="contact">
        <div class="container">
            <div class="row">
                <div class="col-lg-8 col-lg-offset-2 text-center">
                    <h2 class="section-heading">Details Below</h2>
                    <hr class="primary">
                    <p>{{ $exception }}</p>
                </div>
            </div>
        </div>
    </section>
	@endif
@endsection
Now, we will get the template above in production but more details with debug enabled. Here is a sample of the error page with the debug flag enabled:
This can be done for all the error codes that are generated by the application. In the provided code on gitHub, I have also modified the 503 response in a similar way.
That basically covers all the improvements that I wanted to make for the application. Next up, we will be covering the last topic that I wanted to cover: social login.


Hello Mifty, nice tutorial 🙂 I have a question: Can you post soon new tutorial for multi authentication and permissions ( admin/user ) ? Thanks.
Hi Ivaylo,
I’ve got a couple of projects to complete first. So, I will probably work on that part of the tutorial in the next couple of weeks.
hello guys, how to run this project on localhost?
i try to run via CMD and get error like this “not fint artisan”
can you help me, i am new to learn php (please don’t judge)
Thanks
Hey guys can you create level user for admin and user? thanks
nice tut, appriciate for your effort, I have learned a lot.
The process of implementing recaptcha with validation in Laravel 5.5 (https://www.cloudways.com/blog/use-recaptcha-laravel-forms-validation/ ) is also similar. There is no difference at all. You can update the version in this post and it will still be relevant.