I recently had to upgrade the PayPal integration for my site NatureSoundSpa.com that was using PayPal’s Digital Payments API to instantly deliver digital goods. Since the Digital Payments API has been deprecated, I needed to use the new PayPal REST APIs along with the PayPal JavaScript SDK. I was previously using a CakePHP implementation with PayPal’s express checkout for Digital Goods and decided to switch to a Laravel implementation using Laravel 10. If you are not aware of the JavaScript SDK, this PayPal guide does a great job of explaining the JavaScript SDK integration. Basically, the PayPal payment buttons use JavaScript callbacks instead of redirecting the payer to a return URL. Below is a diagram of the flow and the 4 steps as described by PayPal
If you are not aware of the JavaScript SDK, this PayPal guide does a great job of explaining the JavaScript SDK integration. Basically, the PayPal payment buttons use JavaScript callbacks instead of redirecting the payer to a return URL. Below is a diagram of the flow and the 4 steps as described by PayPal.
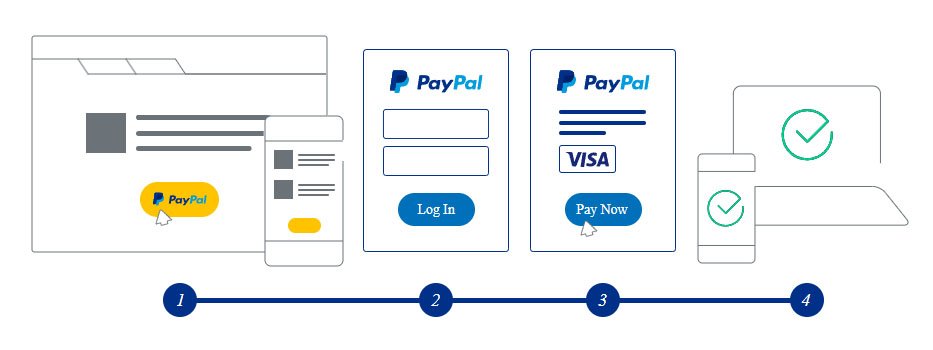
Your payer takes the following actions:
- Clicks a payment button.
- Logs into PayPal.
- Approves the transaction on PayPal.
- Returns to your site where you show the payer a confirmation page.
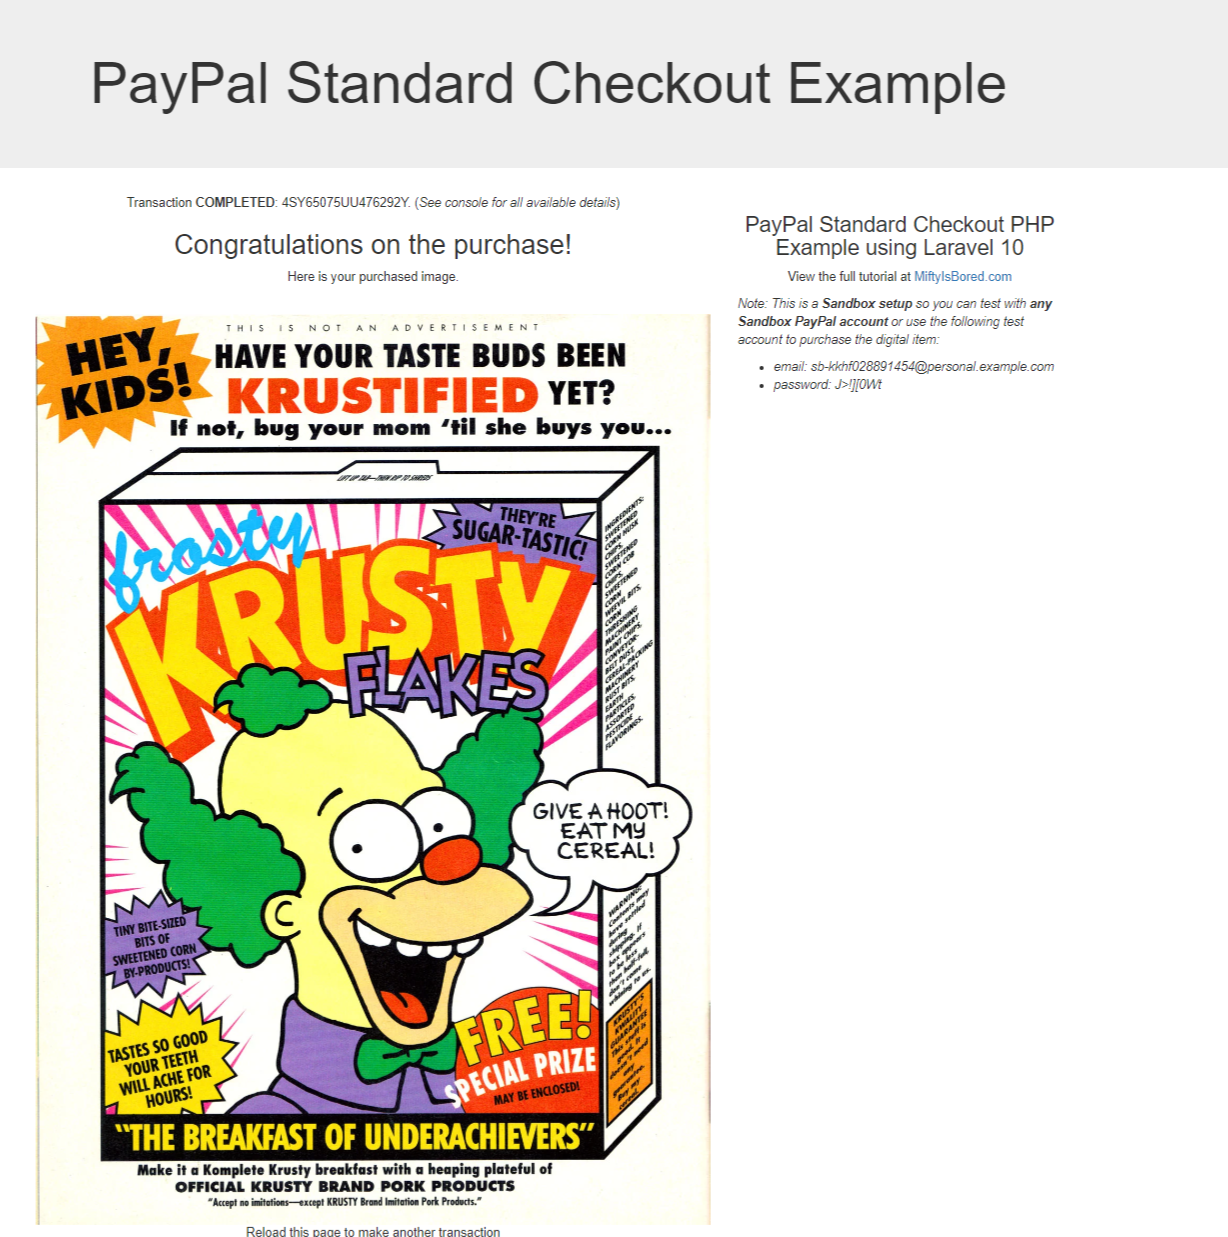
Since I had only integrated with PayPal Express checkout, I decided to switch to the PayPal REST APIs and created this tutorial based on my learning. PayPal does a great job of introducing you to the JavaScript SDK with the PayPal Integration Builder. The example from the integration builder from PayPal is a great starting point but it is not complete and is only implemented in NodeJS. So I completed a proof of concept using Laravel 10 and created this tutorial from that PoC. The application in this tutorial uses PayPal’s Standard Checkout to purchase a digital item and stores the payment information in a payments database. Once the purchase is completed, the digital item (In this case, it is a free image) is made available on the same page. You can see Images of the integration below and you can do a live test using the PayPal Sandbox here.
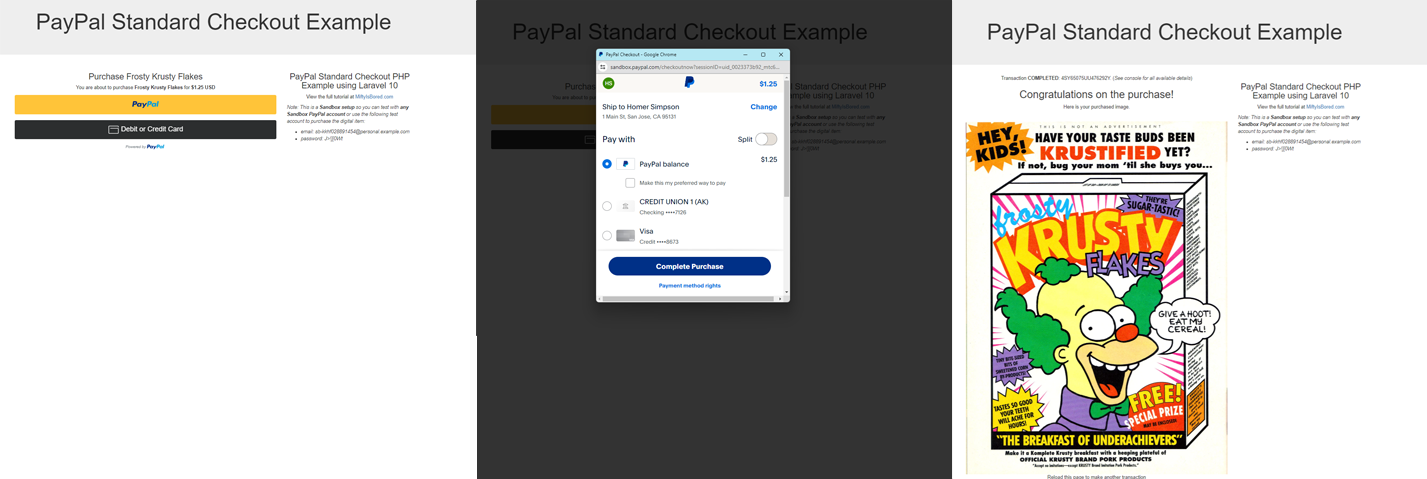
You can use the following test User for testing email: sb-kad4928343310@personal.example.com
password: wDCx)28 . So let’s start the tutorial
Step 1: Create a PayPal account
You can go to https://developer.paypal.com to create a developer account. You will need to create a new app so that you can get a clientID and secret for the new ID. Click on the “Create App” button in order to create an app. Once you’ve created the app, you will be able to get sandbox and production values for your app which will look something similar to the image below
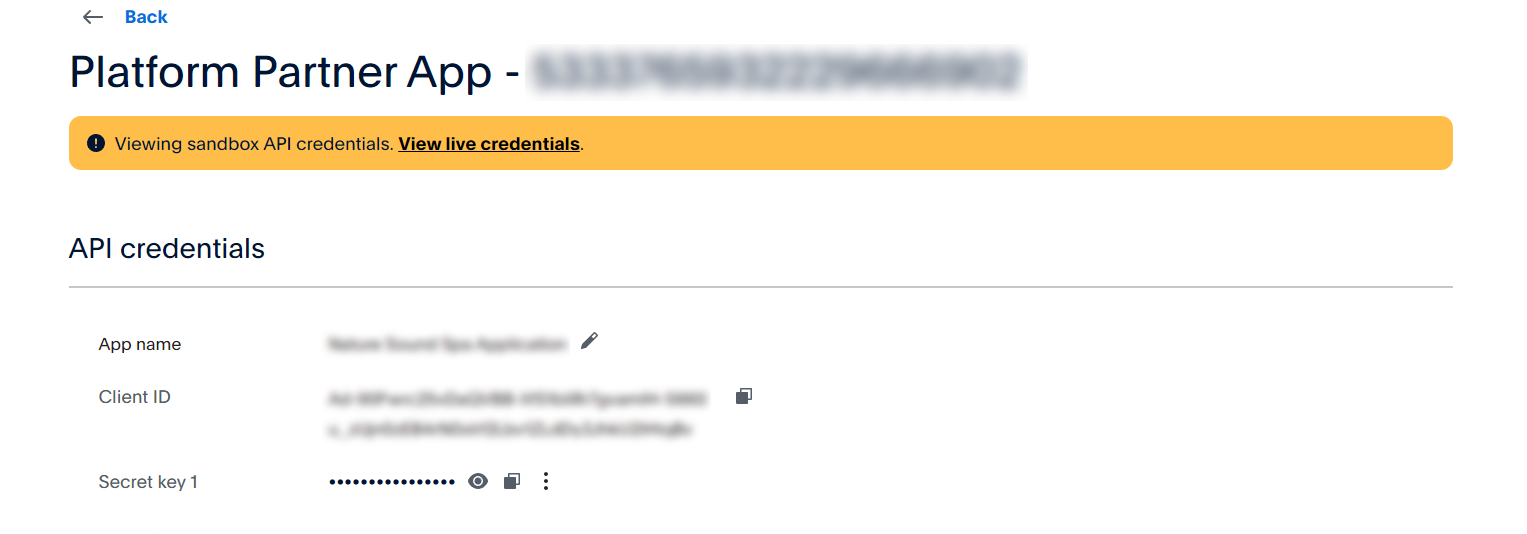
Go ahead and create production and sandbox credentials since we will need these later when we setup our laravel app
Step 2: Install a new Laravel instance
Let’s start with a fresh Laravel instance. I use composer to install laravel for a new project that I called paypal-app. Here is the composer command
composer create-project laravel/laravel paypal-app
Step 3:Create the Laravel routes
Let’s go ahead and define the routes for our application. Since it is a single-page app where all the entire checkout process happens on the same page, we will be mostly interacting with POST commands that will be called via AJAX calls. We will need to define 3 routes as follows:
- The checkout route where the PayPal checkout button will be displayed
- The purchase route where we will initiate the purchase (done via POST)
- The capture order route where we will confirm the payment and store the payment in our payments database (done via POST)
They will interact with a Checkout controller that we will be creating soon but we can already define it inside our routes file. The 3 routes look like so inside the web routes file.
Route::get(  '/',   [CheckoutController::class, 'checkout'])->name('checkout');
Route::post(  '/order',   [CheckoutController::class, 'createOrder'])->name('order');
Route::post(  '/capture',   [CheckoutController::class, 'captureOrder'])->name('capture');
And here is the full contents of the web.php file:
<?php

use Illuminate\Support\Facades\Route;
use App\Http\Controllers\CheckoutController;


/*
|--------------------------------------------------------------------------
| Web Routes
|--------------------------------------------------------------------------
|
| Here is where you can register web routes for your application. These
| routes are loaded by the RouteServiceProvider and all of them will
| be assigned to the "web" middleware group. Make something great!
|
*/
Route::get(  '/',   [CheckoutController::class, 'checkout'])->name('checkout');
Route::post(  '/order',   [CheckoutController::class, 'createOrder'])->name('order');
Route::post(  '/capture',   [CheckoutController::class, 'captureOrder'])->name('capture');
Step 4: Create a PayPal configuration file
Next, we need to create a custom configuration file to store the PayPal configuration information. Unfortunately, there is no artisan command to create a custom config file so you will have to manually create a file called paypal.php inside the config/ folder. This custom PayPal config file will store your API credentials along with a sample item that we will use for this tutorial. It also contains the sandbox and production endpoints used by PayPal. The sample item that we will be allowing users to purchase is this image of Krusty the Clown’s Frosty Krusty Flakes.
Below is the contents of the PayPal config file. Don’t forget to change the PayPal client ID and secret to your own client and secret values.
<?php

return [

    /*
    |--------------------------------------------------------------------------
    | sandbox enabled
    |--------------------------------------------------------------------------
    |
    | This option enables/disables the paypal sandbox. This value can be set
    | through the PAYPAL_SANDBOX_ENABLED environment variable
    |
    */
    'sandbox_enabled' => env('PAYPAL_SANDBOX_ENABLED', true),

    /*
    |--------------------------------------------------------------------------
    | Sandbox Settings
    |--------------------------------------------------------------------------
    |
    | PayPal sandbox settings for the client, secret and endpoints
    |
    */
    'client_id_sandbox' => '[YOUR-PAYPAL-CLIENT-ID-FOR-SANDBOX]',
    'client_secret_sandbox' => '[YOUR-PAYPAL-SECRET-FOR-SANDBOX]',
    'auth_endpoint_sandbox' => 'https://api-m.sandbox.paypal.com/v1/oauth2/token',
    'checkout_endpoint_sandbox' => 'https://api-m.sandbox.paypal.com/v2/checkout/orders',

    /*
    |--------------------------------------------------------------------------
    | Production Settings
    |--------------------------------------------------------------------------
    |
    | PayPal production settings for the client, secret and endpoints
    |
    */
    'client_id_production' => '[YOUR-PAYPAL-CLIENT-ID-FOR-PRODUCTION]',
    'client_secret_production' => '[YOUR-PAYPAL-SECRET-FOR-PRODUCTION]',
    'auth_endpoint_production' => 'https://api-m.paypal.com/v1/oauth2/token',
    'checkout_endpoint_production' => 'https://api-m.paypal.com/v2/checkout/orders',

    /*
    |--------------------------------------------------------------------------
    | Sample Prodct Settings
    |--------------------------------------------------------------------------
    | This is the sample product that we will use for the Proof of Concept
    | This should actually be stored as a database of items but I'm cheating for
    | the PoC. The content that we will make available to the purchaser is an image
    | of Krusty the Clown's Frosty Krusty Flakes from the Simpsons
    | note: you can't use asset with artisan so I need to check if running in console
    | see: https://stackoverflow.com/questions/45152585/laravel-php-artisan-produces-error
    |
    */
    'sample_item_number' => 'SIMPSONS-0001',
    'sample_item_name' => 'Frosty Krusty Flakes',
    'sample_item_description' => 'Frosty Krusty Flakes from Krusty the Clown - The Breakfast of Underachievers',
    'sample_item_price' => 1.25,
    'sample_item_currency' => 'USD',
    'sample_item_content' => app()->runningInConsole() ? '' : "<img src='" . asset('/images/Frosty_Krusty_Flakes_comic.png') . "' width='100%' />",

];
Notice that the sample item is added directly inside the configuration file. That is because this is a quick Proof of Concept. You should store your products in a database and create a model to access them.
Step 5: create a model and migration to store the payments
Since the primary purpose of our app is to process and store PayPal payments, we will create a Payment model along with a Payment migration. The Payment is where all the payment information will be stored. Here is the artisan command to create both
php artisan make:model Payment -m
We now have a Payment model as well as a payment migration. The payment model will contain all the payment data returned from PayPal once a payment is completed. For now, there is nothing to change in the file Models/Payment.php Here is the full content of the file
<?php

namespace App\Models;

use Illuminate\Database\Eloquent\Factories\HasFactory;
use Illuminate\Database\Eloquent\Model;

class Payment extends Model
{
    use HasFactory;
}
The payment migration file will be located inside database/migrations. The migration file will contain all the PayPal fields that we want to store in our database whenever a payment is completed. It will have all payment-related data that we collect from PayPal such as the payer information, the transaction details and the purchased item details. Here are the contents of the payment migration file
<?php

use Illuminate\Database\Migrations\Migration;
use Illuminate\Database\Schema\Blueprint;
use Illuminate\Support\Facades\Schema;

return new class extends Migration {
    /**
     * Run the migrations.
     */
    public function up(): void
    {
        Schema::create('payments', function (Blueprint $table) {

            $table->id();

            $table->string('order_id');
            $table->string('order_status');
            $table->string('payer_id');
            $table->string('payer_name');
            $table->string('payer_email');
            $table->string('payer_country');
            $table->float('paid_amount', 10, 2);
            $table->string('paid_amount_currency');
            $table->string('transaction_id');
            $table->string('transaction_status');
            $table->string('payment_source');
            $table->string('item_number');
            $table->string('item_name');
            $table->float('item_price', 10, 2);
            $table->string('item_price_currency');

            $table->timestamps();
        });
    }

    /**
     * Reverse the migrations.
     */
    public function down(): void
    {
        Schema::dropIfExists('payments');
    }
};
Now that the migration has been created, lets go ahead and create the payments table via a migration. Update your .env file to define your database information and run the migration. In my case, I created a MySQL database called paypal to store the payments as follows
DB_CONNECTION=mysql
DB_HOST=127.0.0.1
DB_PORT=3306
DB_DATABASE=paypal
DB_USERNAME=mifty
DB_PASSWORD=XXXXXXXX
With your database setup, you can now run the migration command below:
php artisan migrate
Once this command finishes, the payments table should be created in your database.
Step 6: create the PayPal Trait
We will create a trait to store all the low-level PayPal communications. A trait in Laravel allows you to create a reusable piece of code that can be shared across multiple classes. This PayPal trait can be used in our future Checkout controller as well as any class that needs to communicate with PayPal. Unfortunately, there is no artisan command to create a trait but we can create a new file in the app/Traits folder called PayPalTrait.php
This PayPalTrait.php trait will use make REST calls to various PayPal endpoints.The three operations that this trait needs to complete are:
- Get the PayPal access tokens through getPayPalAccessToken()
- Use the access token to create a PayPal order request through createPayPalOrder()
- Once the user makes the payment, use the access token to capture the PayPal order through capturePayPalOrder()
A closer look at any one of these three functions shows that they use Guzzle to communicate with PayPal. I tried using Laravel’s HTTPClient, which is based on Guzzle but I couldn’t get it to work as well as the old faithful Guzzle. After a lot of frustration, I just decided to use the Guzzle HTTP Client instead. Here are the contents of getPayPalAccessToken() which passes the client ID and client secret to PayPal in order to get an access token.
    /**
     * Generate an OAuth 2.0 access token for authenticating with PayPal REST APIs.
     * @see https://developer.paypal.com/api/rest/authentication/
     */
    public function getPayPalAccessToken()
    {
        //get the PayPal client ID and secret along with the auth endpoint
        $clientID = $this->getPayPalClientID();
        $clientSecret = $this->getPayPalClientSecret();
        $authEndpoint = $this->getPayPalAuthEndpoint();

        try {
            // use Guzzle Client to build the request to receive the access token
            $token = base64_encode($clientID . ":" . $clientSecret);
            $client = new \GuzzleHttp\Client();
            $response = $client->request('POST', $authEndpoint, [
                'headers' => [
                    'Accept' => 'application/json',
                    'Authorization' => 'Basic ' . $token
                ],
                'form_params' => [
                    'grant_type' => 'client_credentials'
                ]
            ]);

            // check the status code to make sure that we got a successful response from PayPal
            $statusCode = $response->getStatusCode();
            if ($this->isSuccessfulResponse($statusCode)) {
                // decode our response body to retrieve our access token
                $data = json_decode($response->getBody());
                $accessToken = $data->access_token;

                return $accessToken;
            }

        } catch (\GuzzleHttp\Exception\RequestException $e) {
            // we got either  a 400 or 500 response error
            $error['error'] = $e->getMessage();
            $error['request'] = $e->getRequest();
            if ($e->hasResponse()) {
                if ($e->getResponse()->getStatusCode() == '400') {
                    $error['response'] = $e->getResponse();
                }
            }
            // log the error
            Log::error('Error occurred in getPayPalAccessToken request.', ['error' => $error]);

            // due to the error, we did not get an access token return an empty access token
            return "";
        }
    }
Besides these main functions, there are various helper functions to get the configuration values based on the PayPal environment such as getPayPalClientID() and getPayPalClientSecret() which are self-explanatory. Below is the full contents of the PayPalTrait.php file
<?php

namespace App\Traits;

use Illuminate\Support\Facades\Log;
use Illuminate\Support\Arr;

trait PayPalTrait
{

    /**
     * Get the client ID based on the sandbox configuration parameter
     */
    public function getPayPalClientID()
    {
        $clientID = config('paypal.client_id_sandbox');
        if (!config('paypal.sandbox_enabled')) {
            $clientID = config('paypal.client_id_production');
        }

        return $clientID;
    }

    /**
     * Get the client Secret based on the sandbox configuration parameter
     */
    public function getPayPalClientSecret()
    {
        $clientSecret = config('paypal.client_secret_sandbox');
        if (!config('paypal.sandbox_enabled')) {
            $clientSecret = config('paypal.client_secret_production');
        }

        return $clientSecret;
    }

    /**
     * Get the auth endpoint based on the sandbox configuration parameter
     */
    public function getPayPalAuthEndpoint()
    {
        $authEndpoint = config('paypal.auth_endpoint_sandbox');
        if (!config('paypal.sandbox_enabled')) {
            $authEndpoint = config('paypal.auth_endpoint_production');
        }

        return $authEndpoint;
    }


    /**
     * Get the checkout endpoint based on the sandbox configuration parameter
     */
    public function getPayPalCheckoutEndpoint()
    {
        $endpoint = config('paypal.checkout_endpoint_sandbox');
        if (!config('paypal.sandbox_enabled')) {
            $endpoint = config('paypal.checkout_endpoint_production');
        }

        return $endpoint;
    }

    /**
     * determines if a response is a successful response based on the status code
     */
    private function isSuccessfulResponse($statusCode)
    {
        return ($statusCode >= 200 || $statusCode < 300);
    }


    /**
     * Generate an OAuth 2.0 access token for authenticating with PayPal REST APIs.
     * @see https://developer.paypal.com/api/rest/authentication/
     */
    public function getPayPalAccessToken()
    {
        //get the PayPal client ID and secret along with the auth endpoint
        $clientID = $this->getPayPalClientID();
        $clientSecret = $this->getPayPalClientSecret();
        $authEndpoint = $this->getPayPalAuthEndpoint();

        try {
            // use Guzzle Client to build the request to receive the access token
            $token = base64_encode($clientID . ":" . $clientSecret);
            $client = new \GuzzleHttp\Client();
            $response = $client->request('POST', $authEndpoint, [
                'headers' => [
                    'Accept' => 'application/json',
                    'Authorization' => 'Basic ' . $token
                ],
                'form_params' => [
                    'grant_type' => 'client_credentials'
                ]
            ]);

            // check the status code to make sure that we got a successful response from PayPal
            $statusCode = $response->getStatusCode();
            if ($this->isSuccessfulResponse($statusCode)) {
                // decode our response body to retrieve our access token
                $data = json_decode($response->getBody());
                $accessToken = $data->access_token;

                return $accessToken;
            }

        } catch (\GuzzleHttp\Exception\RequestException $e) {
            // we got either  a 400 or 500 response error
            $error['error'] = $e->getMessage();
            $error['request'] = $e->getRequest();
            if ($e->hasResponse()) {
                if ($e->getResponse()->getStatusCode() == '400') {
                    $error['response'] = $e->getResponse();
                }
            }
            // log the error
            Log::error('Error occurred in getPayPalAccessToken request.', ['error' => $error]);

            // due to the error, we did not get an access token return an empty access token
            return "";
        }
    }

    /**
     * create an Order using OAuth 2.0
     * @see https://developer.paypal.com/docs/api/orders/v2/#orders_create
     */
    public function createPayPalOrder($accessToken, $payload)
    {
        // get the paypal checkout endoint
        $checkoutEndpoint = $this->getPayPalCheckoutEndpoint();

        try {
            // use Guzzle Client since I cant get HTTPClient to work
            $client = new \GuzzleHttp\Client();
            $response = $client->request('POST', $checkoutEndpoint, [
                'headers' => [
                    'Content-Type' => 'application/json',
                    'Authorization' => 'Bearer ' . $accessToken
                    // Uncomment one of these to force an error for negative testing (in sandbox mode only). Documentation:
                    // https://developer.paypal.com/tools/sandbox/negative-testing/request-headers/
                    // 'PayPal-Mock-Response' => '{"mock_application_codes": "MISSING_REQUIRED_PARAMETER"}'
                    // 'PayPal-Mock-Response' => '{"mock_application_codes": "PERMISSION_DENIED"}'
                    // 'PayPal-Mock-Response' => '{"mock_application_codes": "INTERNAL_SERVER_ERROR"}'
                ],
                'json' => $payload
            ]);

            $statusCode = $response->getStatusCode();
            if ($this->isSuccessfulResponse($statusCode)) {
                // store the response as an array and add the status code to the array
                $data = json_decode($response->getBody(), true);
                $data = Arr::add($data, 'statusCode', $statusCode);

                return $data;
            }
        } catch (\GuzzleHttp\Exception\RequestException $e) {
            // we got either  a 400 or 500 response error
            $error['error'] = $e->getMessage();
            $error['request'] = $e->getRequest();
            if ($e->hasResponse()) {
                if ($e->getResponse()->getStatusCode() == '400') {
                    $error['response'] = $e->getResponse();
                }
            }
            // log the error
            Log::error('Error occurred in createPayPalOrder request.', ['error' => $error]);
            dd($error);

            // due to the error, return an empty response
            return [];
        }
    }

    /**
     * capture payment for an order using OAuth 2.0
     * @see https://developer.paypal.com/docs/api/orders/v2/#orders_capture
     */
    public function capturePayPalOrder($accessToken, $orderID)
    {
        // build the paypal endoint
        $checkoutURL = $this->getPayPalCheckoutEndpoint() . "/" . $orderID . "/capture";

        try {
            // use Guzzle Client since I cant get HTTPClient to work
            $client = new \GuzzleHttp\Client();
            $response = $client->request('POST', $checkoutURL, [
                'headers' => [
                    'Content-Type' => 'application/json',
                    'Authorization' => 'Bearer ' . $accessToken
                    // Uncomment one of these to force an error for negative testing (in sandbox mode only). Documentation:
                    // https://developer.paypal.com/tools/sandbox/negative-testing/request-headers/
                    // 'PayPal-Mock-Response' => '{"mock_application_codes": "INSTRUMENT_DECLINED"}'
                    // 'PayPal-Mock-Response' => '{"mock_application_codes": "TRANSACTION_REFUSED"}'
                    // 'PayPal-Mock-Response' => '{"mock_application_codes": "INTERNAL_SERVER_ERROR"}'
                ]
            ]);

            $statusCode = $response->getStatusCode();
            if ($this->isSuccessfulResponse($statusCode)) {
                // store the response as an array and add the status code to the array
                $data = json_decode($response->getBody(), true);
                $data = Arr::add($data, 'statusCode', $statusCode);

                return $data;
            }
        } catch (\GuzzleHttp\Exception\RequestException $e) {
            // we got either  a 400 or 500 response error
            $error['error'] = $e->getMessage();
            $error['request'] = $e->getRequest();
            if ($e->hasResponse()) {
                if ($e->getResponse()->getStatusCode() == '400') {
                    $error['response'] = $e->getResponse();
                }
            }
            // log the error
            Log::error('Error occurred in capturePayPalOrder request.', ['error' => $error]);

            // due to the error, return an empty response
            return [];
        }
    }
}
Step 7: create the CheckoutControler
We are finally ready to define the checkout Controller which will handle the payment-related work and use the PayPal trait to handle the low-level Paypal communications. You can use the following command to create the Checkout Controller.
php artisan make:controller CheckoutController
This will create the CheckoutController inside the App/Http/Controllers folder of our app. As covered in the routes definition, we will need this controller to handle the three main functions of this app which are to display the checkout page, create the PayPal order and capture the PayPal order. That’s why I’ve created 3 functions called checkout(), createOrder() and captureOrder(). Try to guess which function does what 🙂 . I also have a function to store the payment in the payments database called storePayment(). Let’s do a quick overview of each function
checkout()
The checkout() function is the only function that will be returning a view. It gets the PayPal client ID and sample item information from the paypal.php configuration file, which it passes over to a view called checkout. We will cover the view later, but for now, you need to know that the view needs the PayPal client ID since we must pass it as a parameter to the PayPal Javascript SDK. The item details are needed for the view to display the item information to the user. Here is the full code for the checkout() function
    /**
     * Create the checkout page
     * @see https://developer.paypal.com/integration-builder/ for the NodeJS version
     */
    public function checkout()
    {
        // get our paypal clientID for the view
        $clientID = $this->getPayPalClientID();

        // get the sample item details from our configuration file
        $item = $this->getItem();

        return view('checkout', ['clientID' => $clientID, 'item' => $item]);

    }
createOrder()
The createOrder() function is called via an AJAX POST request after the user clicks on the PayPal button. It is responsible for passing the item details to PayPal and to also indicate our intent to capture the payment. Your only two possible intents for a payment are to either authorize or capture. Some background information, the basic payment flow, including the PayPal flow follows these 5 steps:
- The payer checks out and provides a card for payment.
- You authorize the payment.
- A hold is placed on the payer’s card until you are ready to capture payment.
- You finalize the transaction and capture the payment.
- The payer’s card is charged.
An authorization places a hold on the funds and is valid for 29 days. If the authorization is not captured within 29 days, the hold is released. It is possible to do both at the same time by simply stating that you intend to capture the funds immediately after the authorization happens. That is what our intent to capture tells PayPal.
The rest of the PayPal payload contains the basic information about the item being purchased such as price and currency. Although the PayPal payload is pretty easy to follow, you should pay special attention to the “custom_id” field. This field should contain your internal product ID and it will be returned by PayPal later when you capture the order.
A cart object is returned from the frontend with the item number. After we have verified that the item number is valid, we fetch the item details and pass the item as a payload to PayPal along with our intent to capture the payment. (Note: Be careful to properly format the PayPal payload, otherwise, your request will be rejected) Then we call the PayPal trait function getPayPalAccessToken() to get an access token which we must pass to PayPal for our PayPal request to be valid. Finally we call the PayPal trait function createPayPalOrder() which expects the access token as well as the payload. This function will make a request to PayPal to create our order. If the request is successful, Paypal will return an order ID in their response. We need to pass this order ID back to the frontEnd. So once we get the response back from PayPal, we will pass it back as the response to the POST request that we got from the frontEnd since it will contain the order ID. Below is the full code for createOrder():
    /**
     * Create an order to start the transaction.
     * @see https://developer.paypal.com/docs/api/orders/v2/#orders_create
     */
    public function createOrder(Request $request)
    {
        // get the cart data from the request and validate the items in the cart
        $cartData = $request->input('cart');

        // get the sample item details from our configuration file
        $item = $this->getItem();

        /**
         * this is where we can add the validation logic for the item that we are about to create an order for
         * since I only have a sample prodct in the configuration file, I will just validate that the sample item
         * is what was returned
         */

        if ($cartData[0]["item"] != $item["id"]) {
            // create an error response since this is not an expected item
            $response = [
                "error" => "Invalid Item",
                "details" => [
                    [
                        "issue" => "Invalid Item Provided",
                        "description" => "Item " . $item["id"] . " is not in our inventory!",
                    ]
                ],
                "debug_id" => "INTERNAL ERROR"
            ];
            return response()->json($response);
        }

        // get an access token & create our payload for the order capture
        $token = $this->getPayPalAccessToken();
        $payload = [
            'intent' => 'CAPTURE',
            'purchase_units' => [
                [
                    'amount' => [
                        'currency_code' => $item["currency"],
                        'value' => $item["price"],
                        'breakdown' => [
                            'item_total' => ['value' => $item["price"], 'currency_code' => $item["currency"]]
                        ]
                    ],
                    'items' => [
                        [
                            'name' => $item["name"],
                            'quantity' => 1,
                            'description' => $item["description"],
                            'sku' => $item["id"],
                            'category' => 'DIGITAL_GOODS',
                            'unit_amount' => ['value' => $item["price"], 'currency_code' => $item["currency"]]
                        ]
                    ],
                    "custom_id" => $item["id"], // used as out internal ID for the product for later retreival
                ]
            ]
        ];

        // create the PayPal order
        $response = $this->createPayPalOrder($token, $payload);

        // return the json response
        return response()->json($response);
    }
captureOrder()
The captureOrder() function is called once the user has provided their information and clicked the submit button on the PayPal window to finalize their payment. Once the user submits their payment information, an order ID is created and this ID must be passed back to the backend via an AJAX POST call. This POST request calls captureOrder() with the order ID. This orderID must be passed to PayPal in order to finalize the payment. captureOrder() uses the PayPal trait function getPayPalAccessToken() to get an access token. This access token, along with the order ID from the frontend must be sent over to PayPal to complete the payment and get the payment details. We use the PayPal trait capturePayPalOrder() to make the request to PayPal. If the capturePayPalOrder() request is successful, then the payment details will be returned. The payment details then need to be stored in our payments database, which is handled by the storePayment() function. Once the payment has been stored in our database, we then retrieve the contents of the paid item and pass it along with the PayPal payment response via AJAX to the frontend. This will allow the frontend to know that the payment was successful and also make the item content available to the user. Below is the full code for createOrder():
    /**
     * capture an order based on a transaction ID
     * @see https://developer.paypal.com/docs/api/orders/v2/#orders_create
     */
    public function captureOrder(Request $request)
    {
        // get the orderID and get access token
        $orderID = $request->input('orderID');
        $token = $this->getPayPalAccessToken();

        // capture the PayPal order and store the captured payment
        $response = $this->capturePayPalOrder($token, $orderID);

        // if we got a succesful payment, then store it in our payments database
        if ($response["statusCode"] >= 200 && $response["statusCode"] < 300) {

            // store the payment
            $this->storePayment($response);

            // attach the purchased good to the response
            $itemContent = config('paypal.sample_item_content');
            $response = Arr::add($response, 'purchased_content', $itemContent);

        }

        // return the json response
        return response()->json($response);
    }
storePayment()
The storePayment() function is used to parse the returned PayPal payment data and build a Payment object that is stored in the database. This function is pretty simple so no analysis of the function is really needed. There are only points to make:
- The “custom_id” field is very important. This should contain your internal product ID so that you are able to know what item was purchased. When the order was created in the createOrder() function, the custom_id field was populated with the sample item’s item number. According to Paypal, “The API caller-provided external ID. Used to reconcile client transactions with PayPal transactions. Appears in transaction and settlement reports but is not visible to the payer.”. In this tutorial, I do a basic check to make sure that the value of custom_id matches the item_number of my sample item. If you have multiple items in your database, you should make sure that the value of custom_id matches a product in your database.
- The PayPal return object format is very specific and takes some time to get used to. Although the structure makes sense, it takes some time to get used to it. So be prepared to be frustrated if this is your first time interacting with this object.
Below is the full content of the Checkout controller:
<?php

namespace App\Http\Controllers;

use Illuminate\Http\Request;
use Illuminate\Support\Arr;
use Illuminate\Support\Facades\URL;

use App\Traits\PayPalTrait;
use App\Models\Payment;

class CheckoutController extends Controller
{
    // load the paypal trait
    use PayPalTrait;

    /**
     * Create the checkout page
     * @see https://developer.paypal.com/integration-builder/ for the NodeJS version
     */
    public function checkout()
    {
        // get our paypal clientID for the view
        $clientID = $this->getPayPalClientID();

        // get the sample item details from our configuration file
        $item = $this->getItem();

        return view('checkout', ['clientID' => $clientID, 'item' => $item]);

    }

    /**
     * Create an order to start the transaction.
     * @see https://developer.paypal.com/docs/api/orders/v2/#orders_create
     */
    public function createOrder(Request $request)
    {
        // get the cart data from the request and validate the items in the cart
        $cartData = $request->input('cart');

        // get the sample item details from our configuration file
        $item = $this->getItem();

        /**
         * this is where we can add the validation logic for the item that we are about to create an order for
         * since I only have a sample prodct in the configuration file, I will just validate that the sample item
         * is what was returned
         */

        if ($cartData[0]["item"] != $item["id"]) {
            // create an error response since this is not an expected item
            $response = [
                "error" => "Invalid Item",
                "details" => [
                    [
                        "issue" => "Invalid Item Provided",
                        "description" => "Item " . $item["id"] . " is not in our inventory!",
                    ]
                ],
                "debug_id" => "INTERNAL ERROR"
            ];
            return response()->json($response);
        }

        // get an access token & create our payload for the order capture
        $token = $this->getPayPalAccessToken();
        $payload = [
            'intent' => 'CAPTURE',
            'purchase_units' => [
                [
                    'amount' => [
                        'currency_code' => $item["currency"],
                        'value' => $item["price"],
                        'breakdown' => [
                            'item_total' => ['value' => $item["price"], 'currency_code' => $item["currency"]]
                        ]
                    ],
                    'items' => [
                        [
                            'name' => $item["name"],
                            'quantity' => 1,
                            'description' => $item["description"],
                            'sku' => $item["id"],
                            'category' => 'DIGITAL_GOODS',
                            'unit_amount' => ['value' => $item["price"], 'currency_code' => $item["currency"]]
                        ]
                    ],
                    "custom_id" => $item["id"], // used as out internal ID for the product for later retreival
                ]
            ]
        ];

        // create the PayPal order
        $response = $this->createPayPalOrder($token, $payload);

        // return the json response
        return response()->json($response);
    }

    /**
     * capture an order based on a transaction ID
     * @see https://developer.paypal.com/docs/api/orders/v2/#orders_create
     */
    public function captureOrder(Request $request)
    {
        // get the orderID and get access token
        $orderID = $request->input('orderID');
        $token = $this->getPayPalAccessToken();

        // capture the PayPal order and store the captured payment
        $response = $this->capturePayPalOrder($token, $orderID);

        // if we got a succesful payment, then store it in our payments database
        if ($response["statusCode"] >= 200 && $response["statusCode"] < 300) {

            // store the payment
            $this->storePayment($response);

            // attach the purchased good to the response
            $itemContent = config('paypal.sample_item_content');
            $response = Arr::add($response, 'purchased_content', $itemContent);

        }

        // return the json response
        return response()->json($response);
    }

    /**
     * store a captured payment
     * @see https://developer.paypal.com/docs/api/orders/v2/#orders_create
     */
    private function storePayment($capturedPayment)
    {
        // get the sample item details from our configuration file
        $item = $this->getItem();

        // add the transaction in our transactions Database.
        if (!empty($capturedPayment) && !empty($capturedPayment['payer'])) {

            // get the order details
            $orderID = $capturedPayment['id'];
            $orderStatus = $capturedPayment['status'];

            // get the payment details
            $purchaseUnit = $capturedPayment['purchase_units'][0];
            $paidAmount = 0;
            $paidAmountCurrency = "N/A";
            $transactionID = "N/A";
            $transactionStatus = "UNKNOWN";
            $transactionItemID = "UNKNOWN";
            if (!empty($purchaseUnit['payments']['captures'][0])) {
                $payment_capture = $purchaseUnit['payments']['captures'][0];
                $transactionID = $payment_capture['id'];
                $transactionStatus = $payment_capture['status'];
                $transactionItemID = $payment_capture["custom_id"];
                $paidAmount = $payment_capture['amount']["value"];
                $paidAmountCurrency = $payment_capture['amount']["currency_code"];
            }


            // get the sample item details from our configuration file
            $itemCurrency = $item['currency'];
            $itemPrice = $item['price'];
            $itemName = $item['name'];
            $itemDesc = $item['description'];
            $itemNumber = $item['id'];

            // confirm that the item is our item. You may want to do extra validation here.
// i'm only doing basic validation to confirm that the item is recognized
            if ($transactionItemID != $item['id']) {
                $itemCurrency = "UNKNOWN";
                $itemPrice = "UNKNOWN";
                $itemName = "UNKNOWN";
                $itemDesc = "UNKNOWN";
            }


            // get the payer details
            $payer = $capturedPayment['payer'];
            $payerID = $payer['payer_id'];
            $payerName = $payer['name'];
            $payerGivenName = !empty($payerName['given_name']) ? $payerName['given_name'] : '';
            $payerSurName = !empty($payerName['surname']) ? $payerName['surname'] : '';
            $payerFullName = trim($payerGivenName . ' ' . $payerSurName);
            $payerEmailAddress = $payer['email_address'];
            $payerAddress = $payer['address'];
            $payerCountryCode = !empty($payerAddress['country_code']) ? $payerAddress['country_code'] : '';

            // get the payment source
            $paymentSource = '';
            if (!empty($capturedPayment['payment_source'])) {
                foreach ($capturedPayment['payment_source'] as $key => $value) {
                    $paymentSource = $key;
                }
            }


            // create a payment entry to store this captured payment
            $payment = new Payment;

            // assign the payment attributes
            $payment->item_number = $transactionItemID;
            $payment->item_name = $itemName;
            $payment->item_price = $itemPrice;
            $payment->item_price_currency = $itemCurrency;
            $payment->payer_id = $payer['payer_id'];
            $payment->payer_name = $payerFullName;
            $payment->payer_email = $payerEmailAddress;
            $payment->payer_country = $payerCountryCode;
            $payment->transaction_id = $transactionID;
            $payment->transaction_status = $transactionStatus;
            $payment->paid_amount = $paidAmount;
            $payment->paid_amount_currency = $paidAmountCurrency;
            $payment->payment_source = $paymentSource;
            $payment->order_id = $orderID;
            $payment->order_status = $orderStatus;

            // write out payment to the database
            $payment->save();
        }
    }

    /**
     * returns the stample item from our configuration file
     */
    private function getItem(){
        // get the sample item details from our configuration file
        $item = [
            "currency" => config('paypal.sample_item_currency'),
            "price" => config('paypal.sample_item_price'),
            "name" => config('paypal.sample_item_name'),
            "description" => config('paypal.sample_item_description'),
            "id" => config('paypal.sample_item_number')
        ];
        return $item;
    }

}
Step 8: create the view
As I mentioned earlier, the payment process will stay on the same page so we just need to load one view that displays the PayPal button and uses Javascript to communicate with the backend using AJAX. Since this tutorial was heavily influenced by the PayPal integration builder, the Javascript is quite similar to the PayPal example.
Before we go over the payment flow, let’s do a quick overview of the PayPal Javascript SDK. To use the PayPal JavaScript SDK, you need to add the javascript library and provide your client ID. This is done with the following line of code
<script src="https://www.paypal.com/sdk/js?client-id=YOUR-CLIENT-ID"></script>
To initiate the SDK, you must call paypal.Buttons().render() to instantiate the buttons on the page. The render() function expects the ID of the HTML container element where the button will be rendered in. In case you are wondering, you can have multiple PayPal buttons on the same page. Since the SDK uses events to determine what needs to be done, we need to define the behaviour for the 2 most important events that are defined by the SDK. Here are the functions related to these events:
- createOrder(): is called when the buyer clicks the PayPal button, which launches the PayPal Checkout window where the buyer logs in and approves the transaction on the paypal.com website.
- onApprove() function is called after the buyer approves the transaction on paypal.com.
Here is the flow of events in our application once the PayPal buttons are rendered.
- The user clicks on the PayPal button to begin the payment process. This calls the createOrder() event handler
- The createOrder() event collects the item data and builds a POST request to the ‘purchase’ route which is the createOrder() function in the checkout Controller. As mentioned earlier, in the case of a successful request, the createOrder() function will return an order ID.
- The order ID from the POST request is passed to the PayPal window as it is displayed to the user.
- Once the user has entered their information inside the PayPal window and confirmed their purchase, the onApprove() event is triggered and an order ID is passed from the PayPal window.
- The order ID from the PayPal window is then passed to the capture route which calls the captureOrder() function in the controller.If the order ID is valid then a success is returned from PayPal. Along with the PayPal response code, the item content is also added to the content returned by captureOrder().
- If a success response is received by the frontend, then we call displayContent() function which will make the content visible on the frontend.
Note that any form in Laravel, including AJAX forms, need to include the CSRF token otherwise the POST request will fail. That is why the CSRF token from Laravel is passed in the header with this line.
<meta name="csrf-token" content="{{ csrf_token() }}">
I can then use jQuery to add the CSRF token in the header of the POST requests made to the backend.
                            headers: {
                                "Content-Type": "application/json",
                                'X-CSRF-TOKEN': $('meta[name="csrf-token"]').attr('content')
                            },
Finally, I load bootstrap from the bootstrap CDN so that we can make the page look good. Below are is the content of the view:
<!DOCTYPE html>
<html lang="en">
<head>
<title>PayPal JS SDK Standard Integration with Laravel</title>
<meta charset="utf-8">
<meta name="viewport" content="width=device-width, initial-scale=1">
<meta name="csrf-token" content="{{ csrf_token() }}">
<script src="https://ajax.googleapis.com/ajax/libs/jquery/3.7.1/jquery.min.js"></script>
<link rel="stylesheet" href="https://maxcdn.bootstrapcdn.com/bootstrap/3.4.1/css/bootstrap.min.css">
<script src="https://maxcdn.bootstrapcdn.com/bootstrap/3.4.1/js/bootstrap.min.js"></script>
</head>
<body>
<div class="jumbotron text-center">
<h1>PayPal Standard Checkout Example</h1>
</div>
<div class="container">
<div class="row">
<div class="col-sm-8">
<div id="result-message" class="text-center">
<h3>Purchase {{$item['name']}}</h3>
<p>You are about to purchase <strong>{{$item['name']}}</strong> for <strong>${{$item['price']}}
{{$item['currency']}}</strong></p>
</div>
<div id="paypal-button-container"></div>
<script
src="https://www.paypal.com/sdk/js?client-id={{$clientID}}¤cy={{$item['currency']}}&components=buttons&enable-funding=paylater,venmo,card"
data-sdk-integration-source="integrationbuilder_sc"></script>
<div id="bottom-container" class="text-center"></div>
</div>
<div class="col-sm-4">
<h3 class="text-center">PayPal Standard Checkout PHP Example using Laravel 10</h3>
<p class="text-center">View the full tutorial at <a href="https://miftyisbored.com/" target="_blank">MiftyIsBored.com</a></p>
<p><em>Note: This is a <strong>Sandbox setup</strong> so you can test with <strong>any Sandbox PayPal
account</strong> or use the following test account to purchase the digital item:
<ul>
<li>email: sb-kkhf028891454@personal.example.com</li>
<li>password: J>!][0Wt</li>
</ul>
</em></p>
</div>
</div>
</div>
<script>
window.paypal
.Buttons({
style: {
shape: "rect",
layout: "vertical",
},
async createOrder() {
try {
const response = await fetch("{{ route('order') }}", {
method: "POST",
headers: {
"Content-Type": "application/json",
'X-CSRF-TOKEN': $('meta[name="csrf-token"]').attr('content')
},
// use the "body" param to pass the order information
body: JSON.stringify({
cart: [
{
item: "{{ $item['id'] }}",
quantity: "1",
},
],
}),
});
const orderData = await response.json();
if (orderData.id) {
return orderData.id;
} else {
const errorDetail = orderData?.details?.[0];
const errorMessage = errorDetail
? `${errorDetail.issue} ${errorDetail.description} (${orderData.debug_id})`
: JSON.stringify(orderData);
throw new Error(errorMessage);
}
} catch (error) {
console.error(error);
resultMessage(`Could not initiate PayPal Checkout...<br><br>${error}`);
}
},
async onApprove(data, actions) {
var oID = data.orderID;
try {
const response = await fetch(`{{ route('capture') }}`, {
method: "POST",
headers: {
"Content-Type": "application/json",
'X-CSRF-TOKEN': $('meta[name="csrf-token"]').attr('content')
},
// use the "body" param to pass the orderID
body: JSON.stringify({
orderID: oID,
}),
});
const orderData = await response.json();
// Three cases to handle:
// (1) Recoverable INSTRUMENT_DECLINED -> call actions.restart()
// (2) Other non-recoverable errors -> Show a failure message
// (3) Successful transaction -> Show confirmation or thank you message
const errorDetail = orderData?.details?.[0];
if (errorDetail?.issue === "INSTRUMENT_DECLINED") {
// (1) Recoverable INSTRUMENT_DECLINED -> call actions.restart()
// recoverable state, per https://developer.paypal.com/docs/checkout/standard/customize/handle-funding-failures/
return actions.restart();
} else if (errorDetail) {
// (2) Other non-recoverable errors -> Show a failure message
throw new Error(`${errorDetail.description} (${orderData.debug_id})`);
} else if (!orderData.purchase_units) {
throw new Error(JSON.stringify(orderData));
} else {
// (3) Successful transaction -> Show confirmation or thank you message
// Or go to another URL: actions.redirect('thank_you.html');
const transaction =
orderData?.purchase_units?.[0]?.payments?.captures?.[0] ||
orderData?.purchase_units?.[0]?.payments?.authorizations?.[0];
resultMessage(
`Transaction <strong>${transaction.status}<\/strong>: ${transaction.id}. (<em>See console for all available details<\/em>)`,
);
displayContent(orderData?.purchased_content);
console.log(
"Capture result",
orderData,
JSON.stringify(orderData, null, 2),
);
}
} catch (error) {
console.error(error);
resultMessage(
`Sorry, your transaction could not be processed...<br><br>${error}`,
);
}
},
})
.render("#paypal-button-container");
// Example function to show a result to the user. Your site's UI library can be used instead.
function resultMessage(message) {
const container = document.querySelector("#result-message");
container.innerHTML = message;
}
// Example function to make the purchased item available upon payment confirmation.
function displayContent(content) {
const containerPayPal = document.querySelector("#paypal-button-container");
containerPayPal.innerHTML = "<div class='text-center'><h2>Congratulations on the purchase!</h2><p>Here is your purchased image.</p><br/>" + content + "</div>";
const containerBottom = document.querySelector("#bottom-container");
containerBottom.innerHTML = "Reload this page to make another transaction";
}
</script>
</body>
</html>
Step 9: Add the Item to our public folder
Since the purpose of the application is to instantly deliver the item once it is purchased, we need to make sure that the item is stored somewhere on our server. For this tutorial, I have the file “Frosty_Krusty_Flakes_comic.png” located inside the public/images folder. (click on the link to download the file)
Step 10: Test the code
You can now run the app using Laravel’s serve command
php artisan serve
that’s it. the tutorial is complete and you are good to go. You can see a live demo of this tutorial by clicking here. As usual, if you have any questions, leave a comment and I’ll respond whenever I can.